Everything Marqup does, in the order you will meet it on a plan review: open the set, mark it up, measure it, track the comments, compare the next submittal, send it back.
01Quick start
Your first review in five minutes
InstallOpen Marqup.dmg and drag Marqup onto Applications, then open it from there. If you open it straight from the installer disk or from Downloads, Marqup offers to move itself to Applications and reopens from there. Once it runs from Applications it ejects the installer disk and moves Marqup.dmg from Downloads to the Trash (drag it back out if you want to keep it). Marqup runs on Apple Silicon and Intel Macs with macOS 13 or later.
Open the set. Choose File › Open, drag a PDF onto the Marqup icon, or pick Open PDF on the start screen. Large plotted sets open in a fraction of a second; sheets draw as you reach them.
Find your sheet. The sidebar lists every sheet by its label. Click one, or press the arrow keys to step through the set.
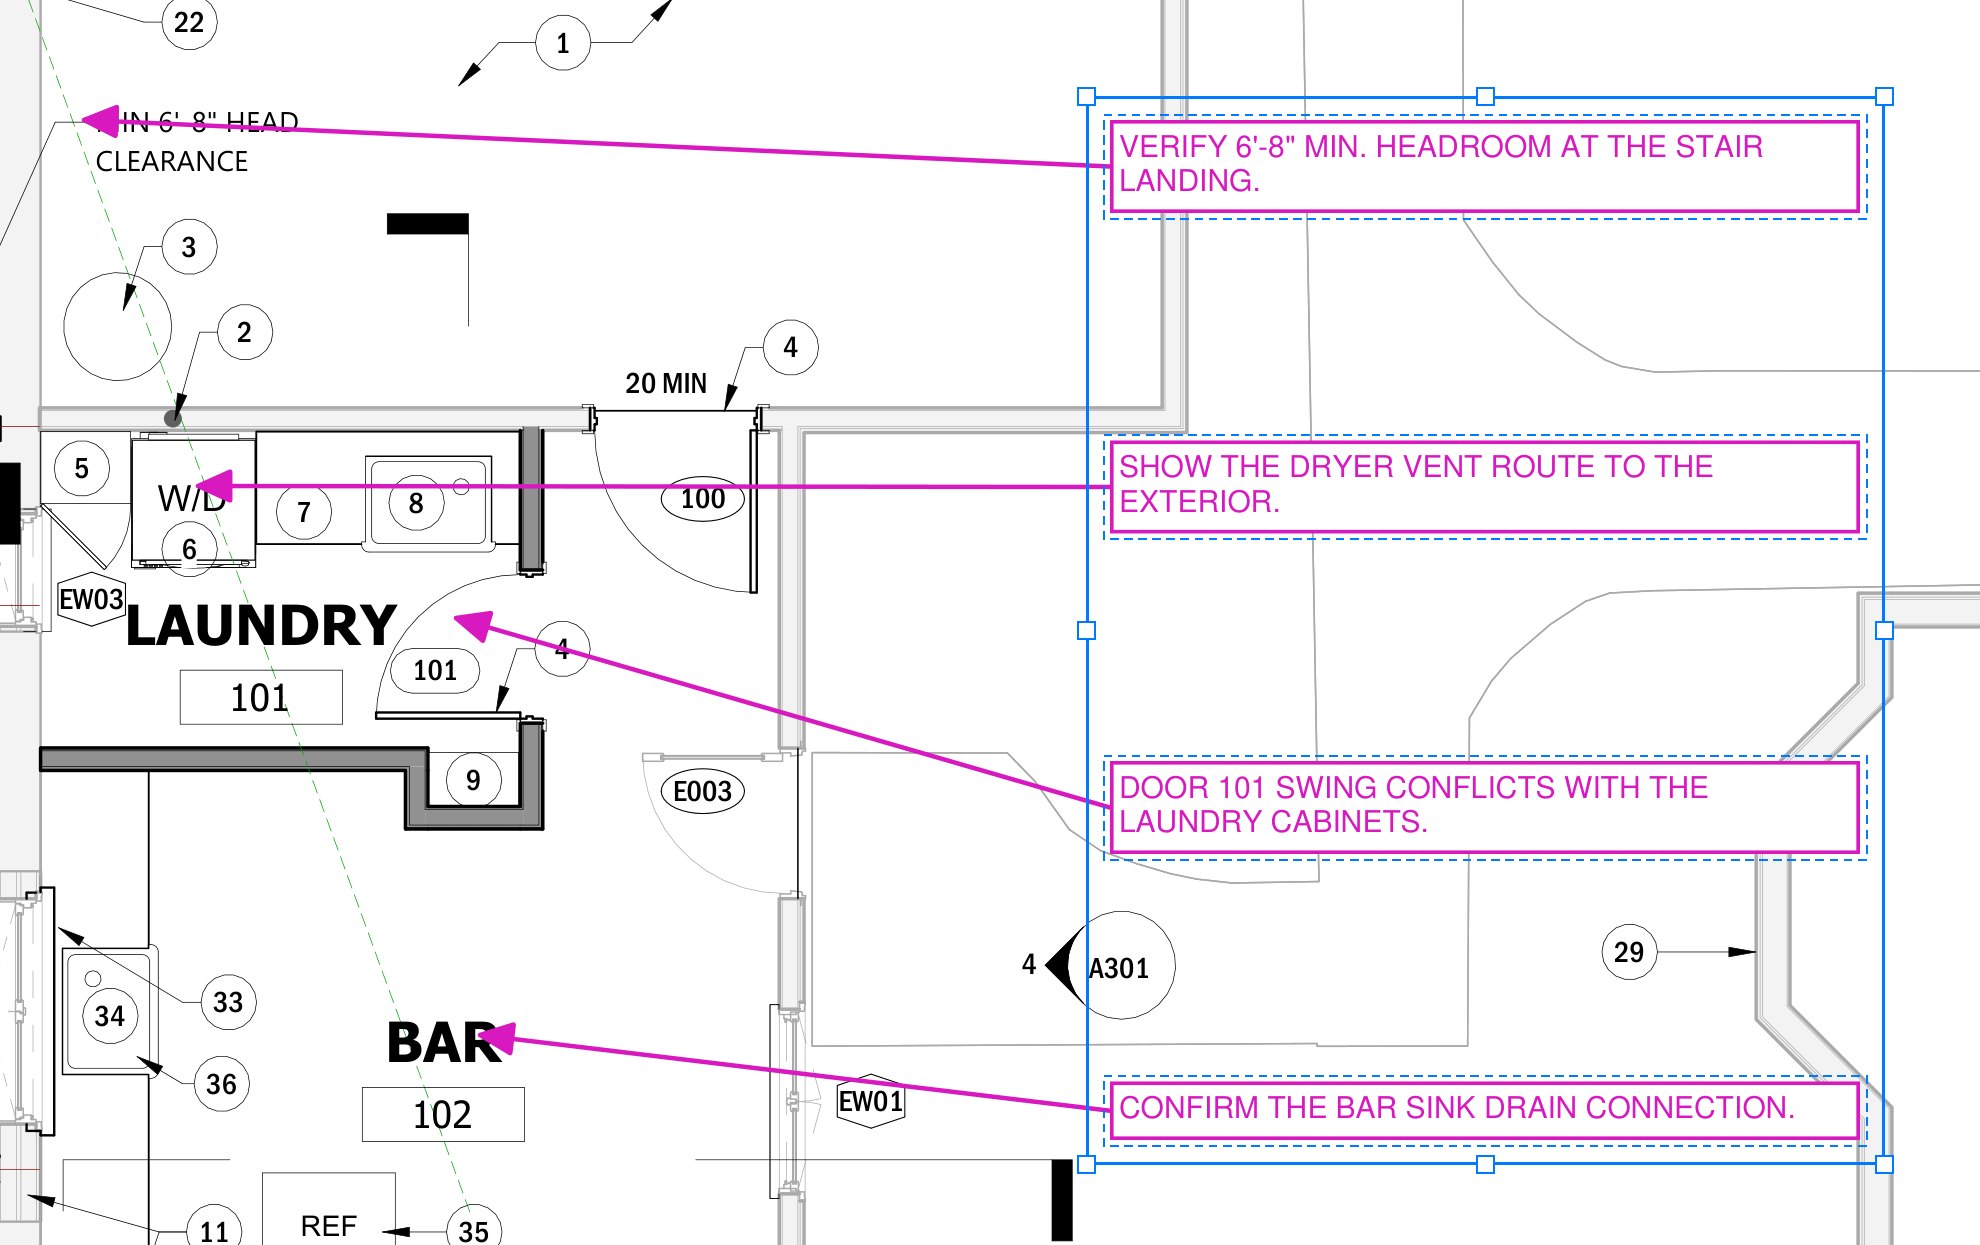
Mark it up. Press C for a cloud, click the corners around the problem and double-click to finish. Press Q for a callout, click the point, then drag where the words go and type.
Measure it. Press ⇧⌥L and click along a line. If the sheet was plotted from CAD the length reads in feet straight away; if not, Marqup offers to read the scale printed on the sheet.
Check your work. Press ⌥⌘L for the Markups List: every markup on the set, with its sheet, author and status.
Send it back. Press ⌘S. The markups are saved into the PDF as standard markups that any reviewer can open. For an agency upload, use File › Export › Flattened for Submittal.
No PDF yet?Choose Create PDF from File or Create Blank PDF on the start screen, or File › Create: turn pictures, Word, RTF, web pages or text into a PDF, combine files, or scan from a scanner, camera or iPhone. In Finder, right-click any file › Quick Actions › Convert to PDF in Marqup.
Marqup works on standard PDFs. Nothing is converted and no copy is made: your markups are saved into the file you opened.
02The window
A tour of the window
Sidebar left · toolbars top and side · Properties right · bottom bar
Start screenShows when no file is open: Open PDF, Create PDF from File, Create Blank PDF and Combine Files, your Favorite Folders (Add Folder… for the ones you open plans from often), and your recent files. Click the pin beside a file to keep it at the top. Drop PDFs anywhere on it to open them. The version, updates and About Marqup sit along the bottom.
Title barThe sidebar button at the far left (click to show or hide the sidebar; its arrow picks Thumbnails, Bookmarks and the page layout), the file name, the tool sets in the title bar, the Tools button, and Share and Properties at the right. The toolbars share the title bar's color, so the top of the window reads as one band.
Tools buttonShows or hides the Top bar, side and floating toolbars together; the title bar keeps its own sets. Also View › Show Tools (⌥⌘T).
Top barA row of toolbars under the title bar, starting past the left toolbar. File, Draw and Stamps sit there to start.
Option barThe thin strip under the title bar shows the settings of the tool in use: color, text size, bold and Autosize text box for text tools; line width, fill, line style and opacity for shapes; the sheet scale with Set Scale, Read, Calibrate and Snap for measuring tools; the Highlight+ colors for the highlighter. Type a number into a box, or click its arrow for a slider; [ and ] step the tool's main size (line width, text size) down and up. With markups selected it changes them instead. View › Option Bar (⌥⌘O) hides it.
SidebarThumbnails of every sheet with its label and scale, the set's bookmarks, search results or layers, picked from the menu at its top. The sheet on screen has an accent outline. Drag thumbnails to reorder, drop PDFs from Finder between them to insert those pages, press Delete for Delete Pages, or right-click to insert, rotate, extract, replace or delete pages.
Side toolbarsTool sets placed on the left or right edge, one or two columns deep. Measure sits on the left to start with.
SheetThe drawing itself. Scroll to move, pinch or hold Command and scroll to zoom; the spot under the pointer stays put. Hold Space to pan with any tool.
Right panelThree tabs at its top: Properties, File Info and Tool Chest.
PropertiesThe first tab: color, line width, fill, opacity, line style, font, measurement value, scale and replies for the selected markup. With nothing selected it shows the sheet's scale and the Set Scale, Calibrate and Read buttons.
File InfoThe second tab: name, kind, size, created and modified dates, then pages, sheet sizes, scales and the number of markups, layers and bookmarks. More Info… opens the full window. The info button in the bottom bar opens this tab.
Tool ChestThe tray tab: the libraries as tiles, two across. Favorites (tools saved with Add to Tool Chest in Properties, and symbols you starred), Standard Tools, then each symbol library that is switched on. Click a tile to open it as a list, and the back button to return; click a tool or symbol to pick it up. The pop-out button opens the Library Manager. See Symbols under Markup tools.
Bottom panelOpens under the sheet (⌥⌘L, or the list button at the bottom left), with two tabs. Markups: every markup on the set with sheet, type, author, company, department, status, date and value. Layers: the PDF's CAD layers (see Layers below).
Hide markupsThe eye button in the bottom panel's header, or View › Hide Markups, hides every markup so you can read the drawing underneath. While they are hidden the eye turns into a red badge, so you can't forget they are off.
Bottom barMarkups List, the Snap menu, the comment card button, zoom, Fit Width and Fit Page, single page, continuous or side by side, Clean Screen and File Info. The page box, with first, previous and next sheet beside it, sits in the middle of the bar, followed by the sheet name, scale, sheet size and zoom.
Snap menuClick Snap in the bottom bar for a menu like any Mac menu. Snap to Drawing (F3) turns snapping on and off. Below it, Endpoints, Midpoints, Intersections, Perpendicular and Nearest Point on a Line each turn on or off on their own; a check mark shows which are on. Snap Settings… opens the snap choices in Settings.
Comment card buttonThe speech-bubble button in the bottom bar turns the hover comment cards on and off (see Comment cards under Reviewing). Turn them off when you want to move across a busy review sheet without cards popping up.
Page boxType a page number and press Return. Click in and out without typing and you stay on the sheet you are on. The arrows sit beside the page count, so they never move under the pointer. Click the sheet name for a list of every sheet.
Clean Screen⇧⌘F hides every panel and toolbar, leaving only the sheet. Press it again, or Esc, to bring them back.
Settings⌘, Five panes: General (your name, company and department, written on every markup; Light, Dark or Match System; a full-screen crosshair; reopening last session's files), Navigation (the wheel zooms or scrolls, zoom per click, smooth zoom, the layout for new files), Tools (click, click or click and drag, Reuse Tools, defaults, autosize, the stamp folder and line styles), Measure and Advanced (updates, the PDF engine check, backups and earlier saves, Reset All Settings).
Other windows
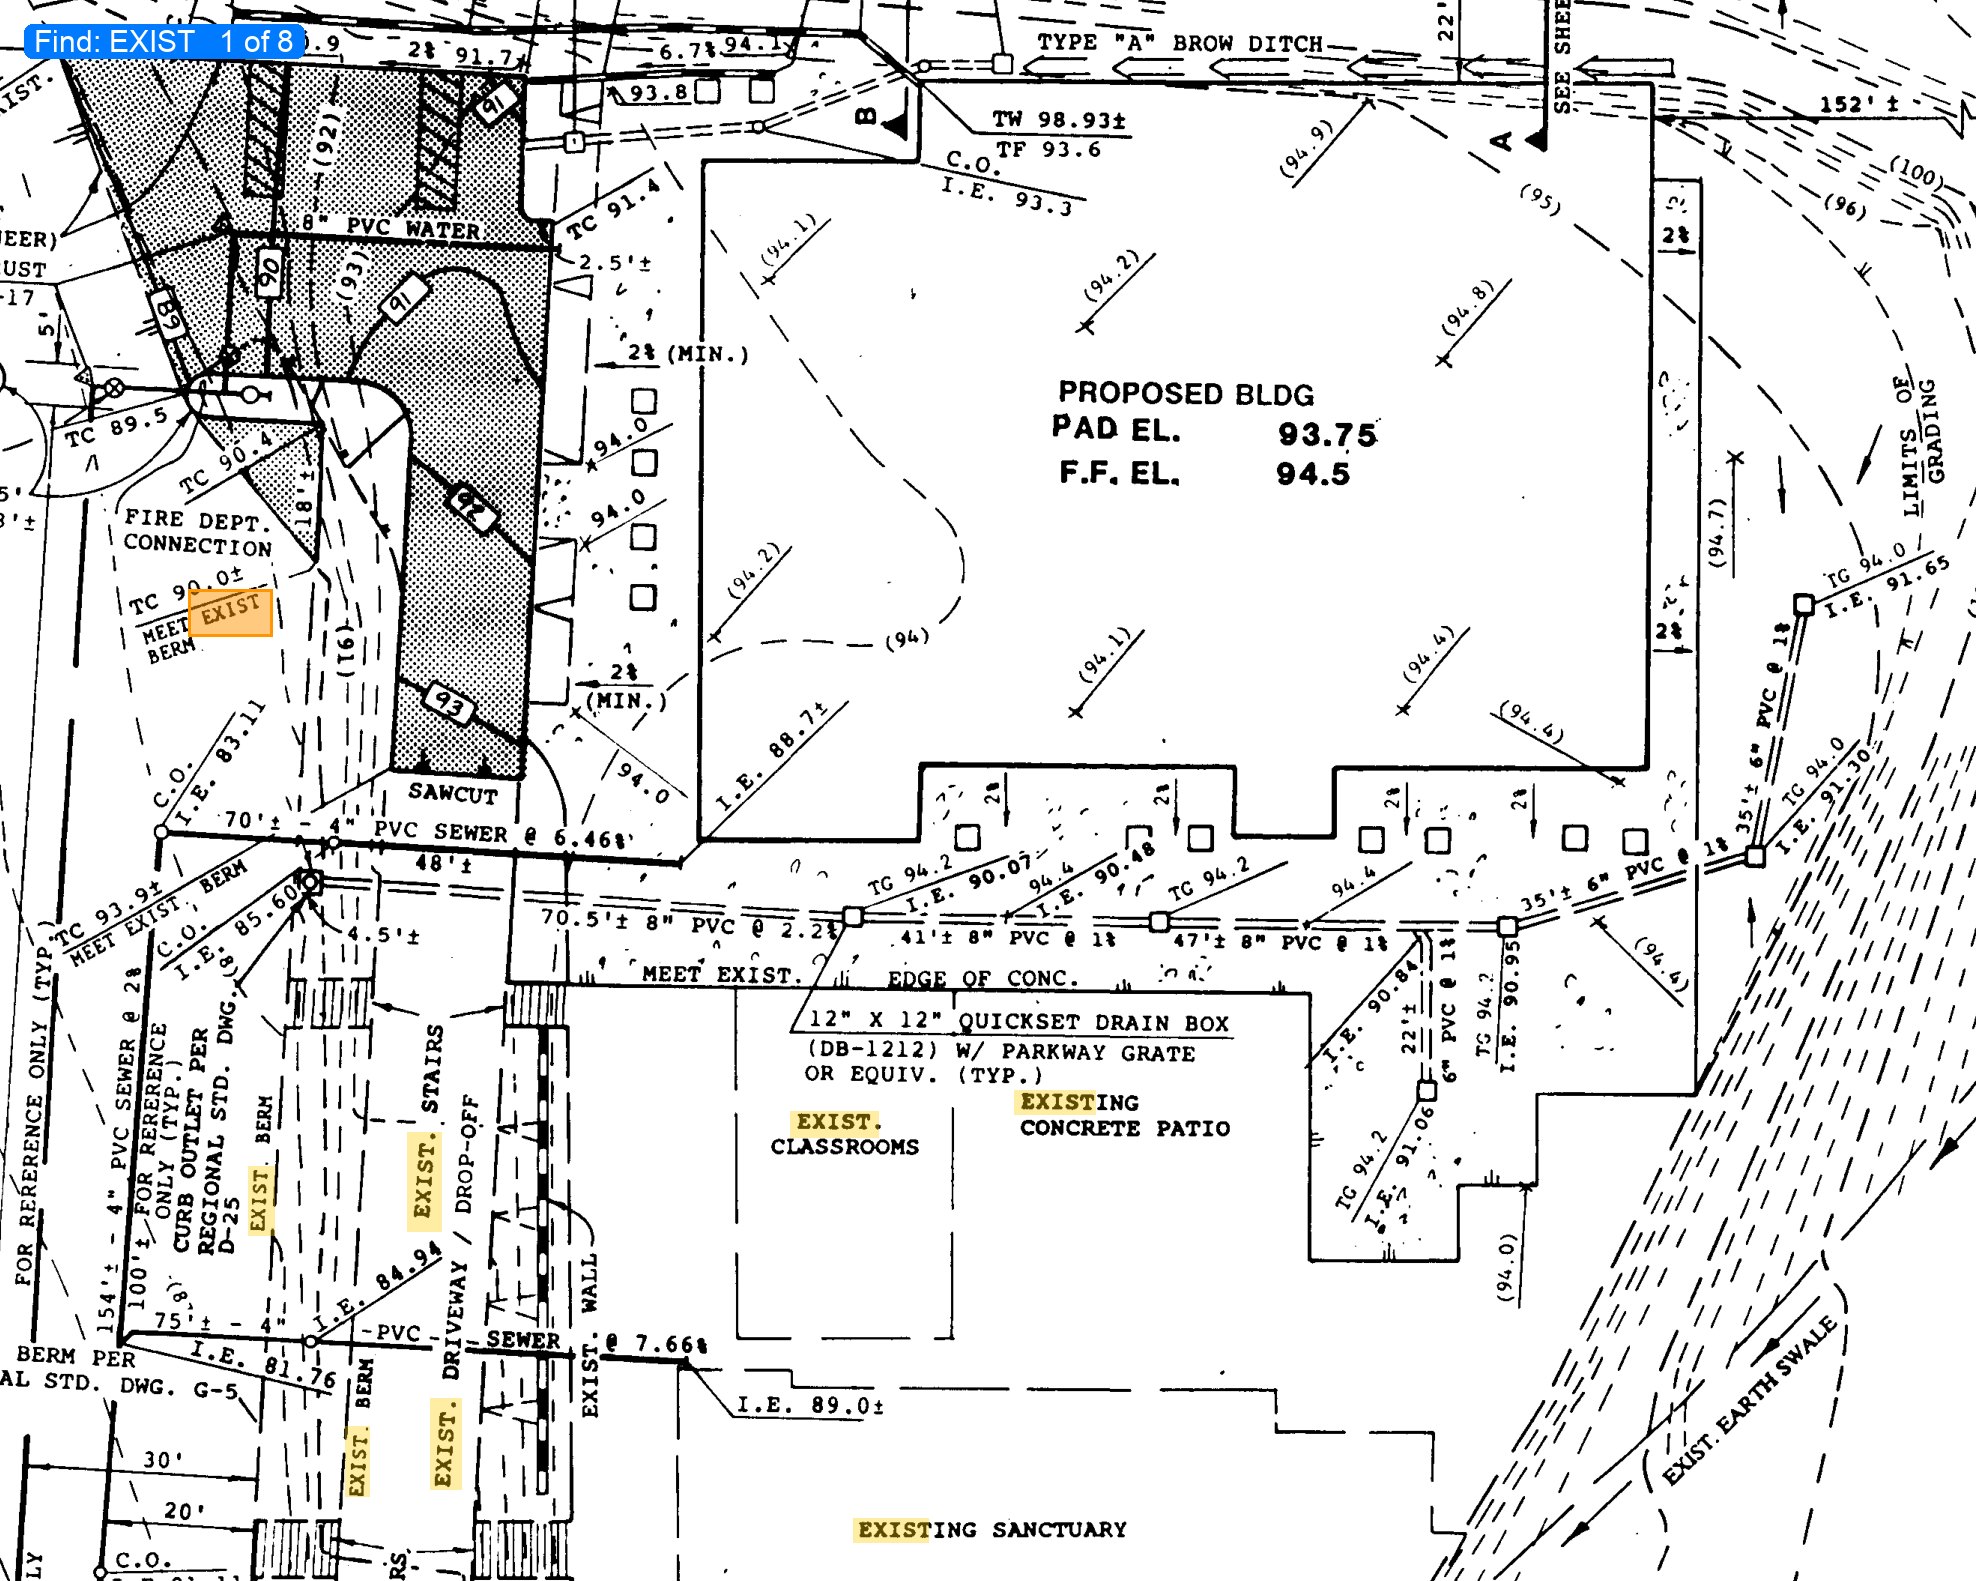
Find⌘F searches the sheet text and the markup text across the set; results list by sheet.
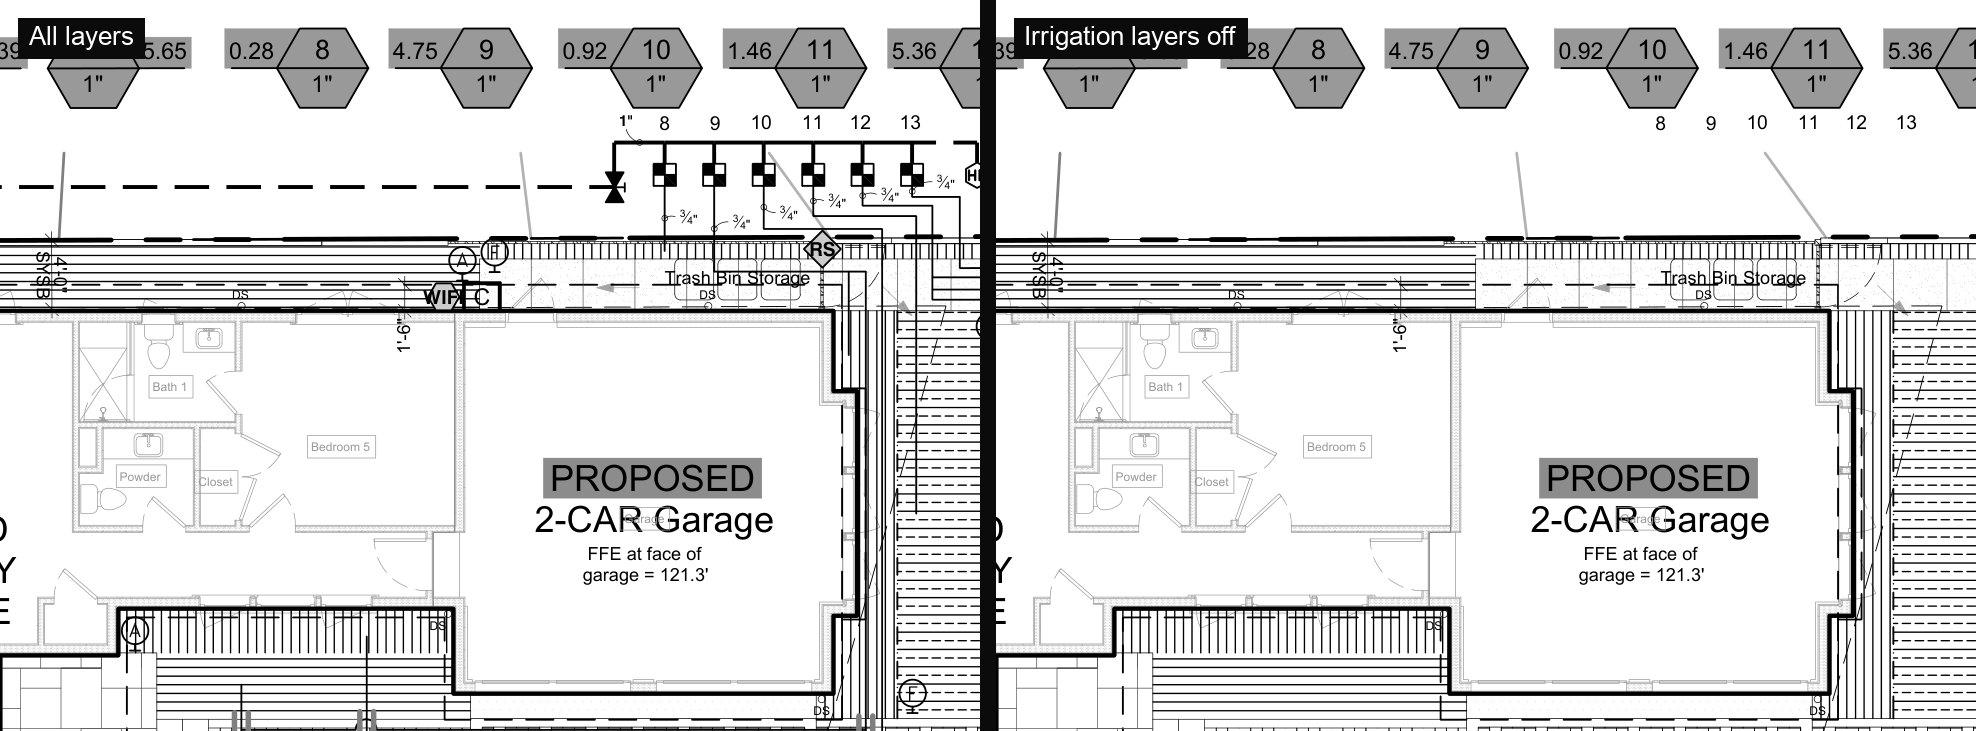
LayersView › Layers, or the Layers tab of the bottom panel: the CAD layers in the PDF by name, with a filter box. Turn one off to hide it on every sheet. Select several and choose Show These, Hide These or Isolate (show only these); Invert swaps on and off; Show All and Hide All set every layer at once.
Library ManagerTools › Library Manager…, or the pop-out button in the Tool Chest: every symbol library with previews, and the Title Blocks library. Switch libraries on or off in the Tool Chest, import a folder of PDFs, pictures or DXF and DWG drawings as a new library, drag files in or use Add Items…, make a new library, rename, reorder, move or copy symbols between libraries, and add symbols to Favorites. Right-click a symbol or library for the same commands.
Compare RevisionsDocument › Compare › Compare Revisions…: the older and newer sheet side by side in one viewer (see Comparing revisions).
ComparePick an older and a newer set to overlay or to cloud what changed.
BatchOne operation over a folder of PDFs, written as copies.
Highlight ColorsName, recolor and describe the Highlight+ colors.
About MarqupMarqup › About Marqup: the version and build, with links to the License Agreement and the Acknowledgments (the notices and license texts of the open source parts of the PDF engine).
Send FeedbackHelp › Send Feedback or Report a Bug: a short form that goes straight to the Marqup team (see Help and updates).
Two screens
Marqup is at home on a desk with two monitors: the whole sheet on one screen, a detail or the Markups List on the other.
New Window for This File ⌃⌘NWindow › New Window for This File opens the file you are in a second time, in a window of its own. The first time it opens on your other screen if there is one. Both windows show the same file: draw a cloud in one and it appears in the other at once. Closing one leaves the file open in the other; closing the last window closes the file.
Panels in their own windowsThe Pages panel, the Markups List and the Properties panel each have a small button at their top corner that moves the panel into a window of its own. Drag that window to the other monitor and size it as you like. Click the same button again, or close the panel's window, to put the panel back. The Window menu has the same three commands: Pages Panel in Its Own Window, Markups List in Its Own Window and Properties Panel in Its Own Window.
Back where you left themMarqup remembers where its windows and panel windows were, on which screen and at what size, and opens them there next time. If a window was last on a screen that is no longer plugged in, such as a laptop away from its desk, Marqup brings it back onto a screen you can see.
03Toolbars
Toolbars where you want them
Tools come in five sets. Each set can sit in the title bar, in the Top bar under it, on the left or right edge, float in its own small window, or be hidden. To start, Select is in the title bar, File, Draw and Stamps in the Top bar, and Measure on the left. Click Tools in the title bar to show or hide all but the title bar's sets.
FileOpen, Save, Print, Share, Search, Undo, Redo.
SelectSelect, Pan, Zoom and Select Text.
DrawCallout, Callout Plus, Text Box, Typewriter, Cloud, Cloud+, Rectangle, Ellipse, Line, Arrow, Dimension, Polyline, Polygon, Pen, Highlight, Mark Complete, Image.
StampsThe stamp button with its arrow: pick a stamp, import one, or open the stamp folder.
Move a toolbar
Right-click any Top, side or floating toolbar › Dock and choose where it goes: Title Bar, Top, Left, Left Second Column, Right, Right Second Column, Floating or Hide.
Or drag it by its dotted grip (or hold Command and drag it anywhere) to another edge. A faint copy of the toolbar follows the pointer and the edge it will snap to lights up. Drop it away from the edges and it floats.
For bigger changes choose Edit Toolbars (right-click a toolbar, or View › Toolbars): every toolbar drags by its whole body; click the sheet or press Esc when finished.
More toolbars are in View › Toolbars, hidden until you place them: Exhibit (New Exhibit, Place Drawing, Re-crop, Title Block, Exhibit Info, Graphic Scale), Review (Compare Revisions, Overlay, Recognize Text, Redact, Apply Redactions, Flatten) and Pages (rotate, insert, extract, crop, delete). Legend is on the Measure toolbar.
Each side can stack two toolbars side by side, at the same icon size as the title bar.
The title bar
Right-click the title barIcon and Text, Icon Only, Text Only, and Customize Toolbar…, which lets you drag sets into and out of the title bar.
The » buttonShows when the window is too narrow for every set. Click it for the tools that did not fit, listed by name. A long set such as Draw splits in two, so only its second half moves into » first; Stamps, Share and Properties always stay.
Pick buttonsView › Toolbars › Customize Toolbars… shows or hides single buttons within a set.
Start overView › Toolbars › Reset Toolbars puts every set back where it began.
04Markup tools
Draw a markup
Pick a tool from a toolbar or press its key, then click on the sheet. Lines, clouds and polylines take one click per corner; double-click or press Return to finish. A right-click, or a click on the first point, finishes a polyline closed into a shape; a double-click or Return leaves it open. Press Esc to put the tool down. Tools › Reuse Tools (⌥⌘K) keeps a tool picked after each markup.
While drawing, the pointer is a crosshair with the tool's icon at its corner, and a tip beside it reads out lengths, radii, angles and sizes as you draw or reshape.
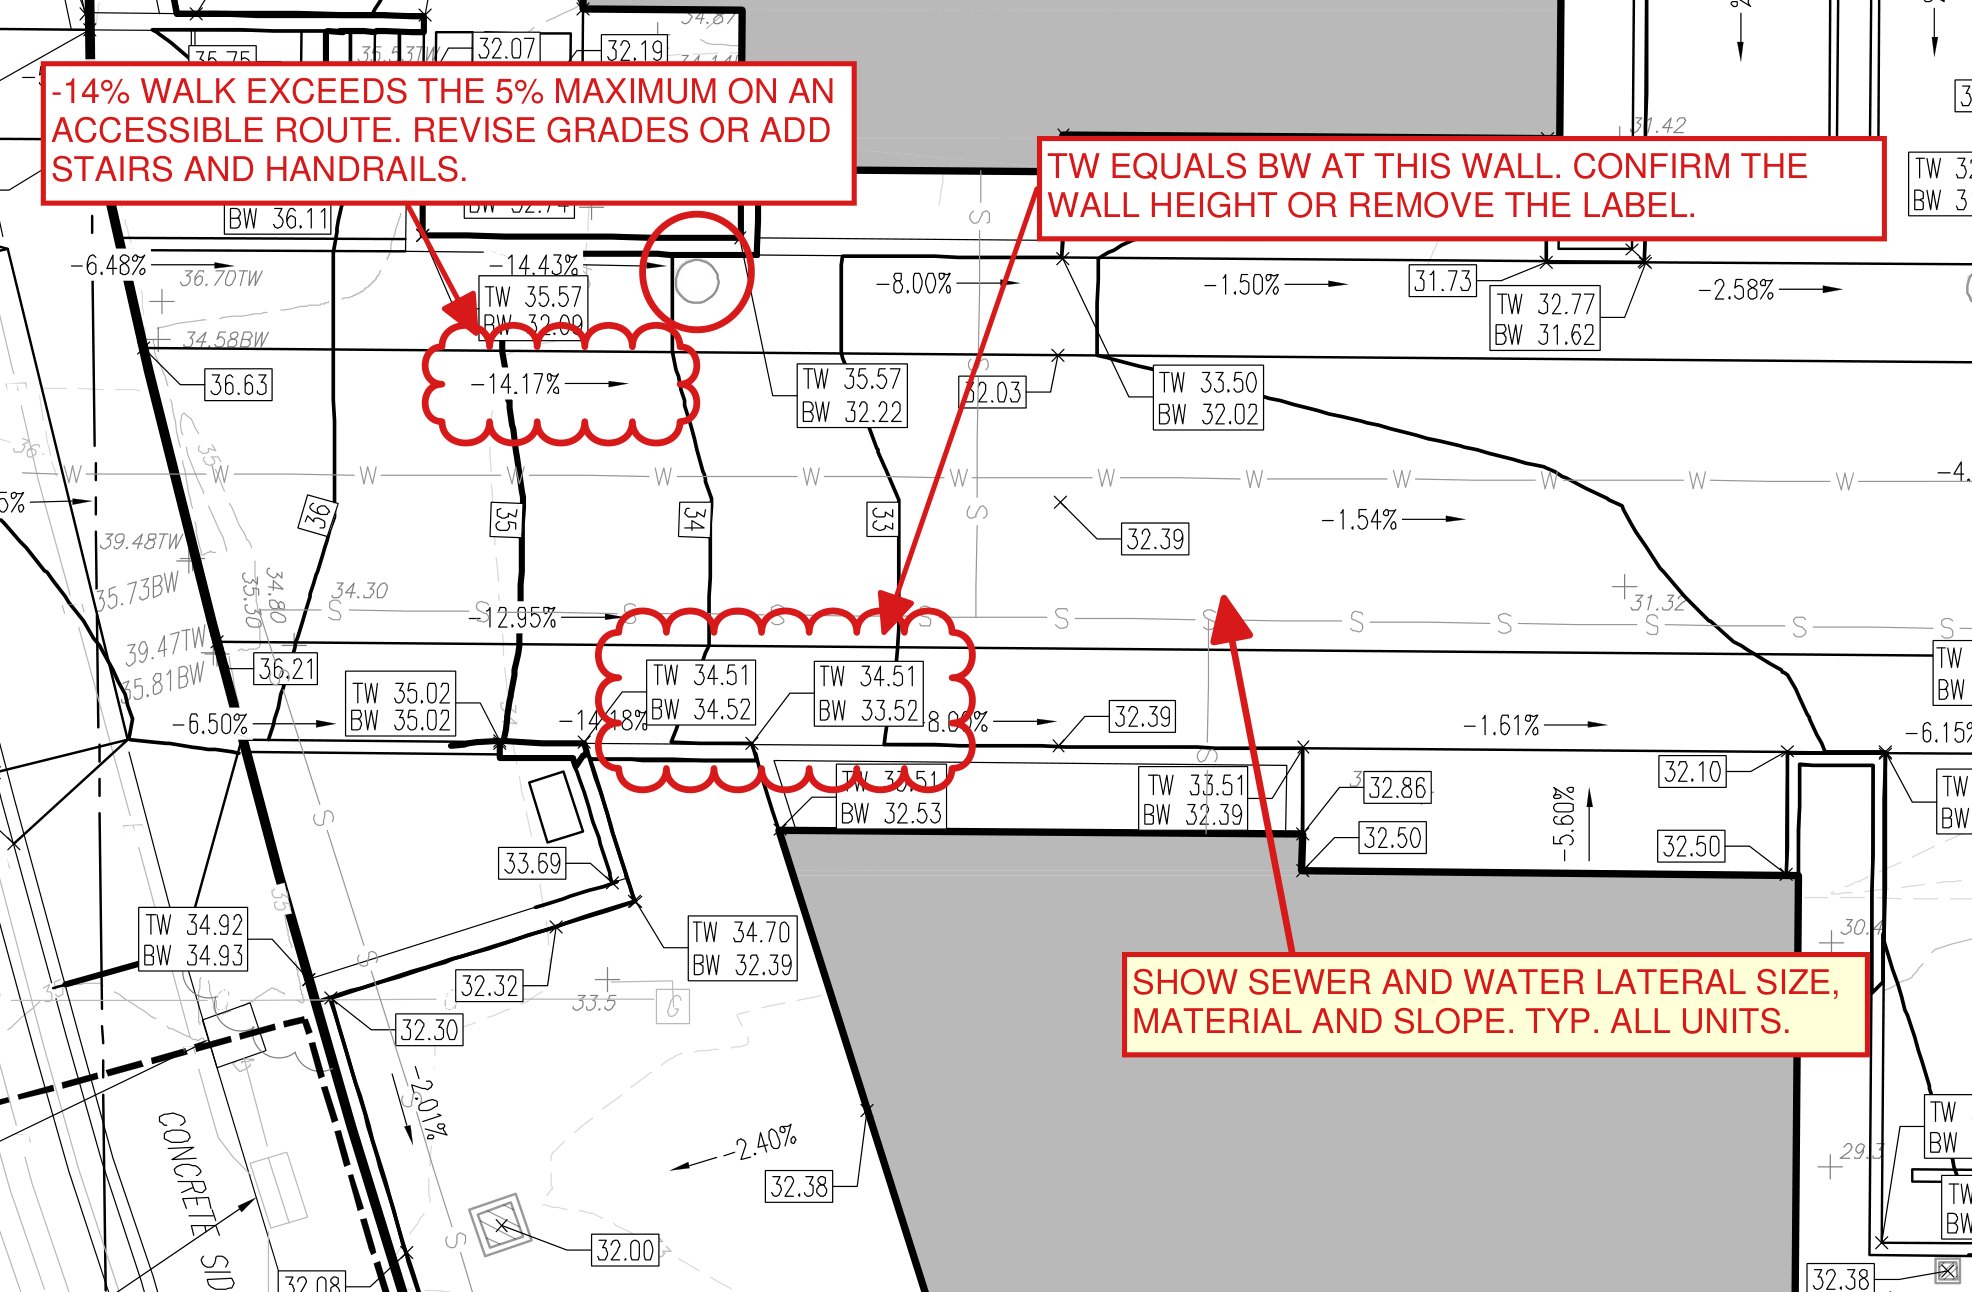
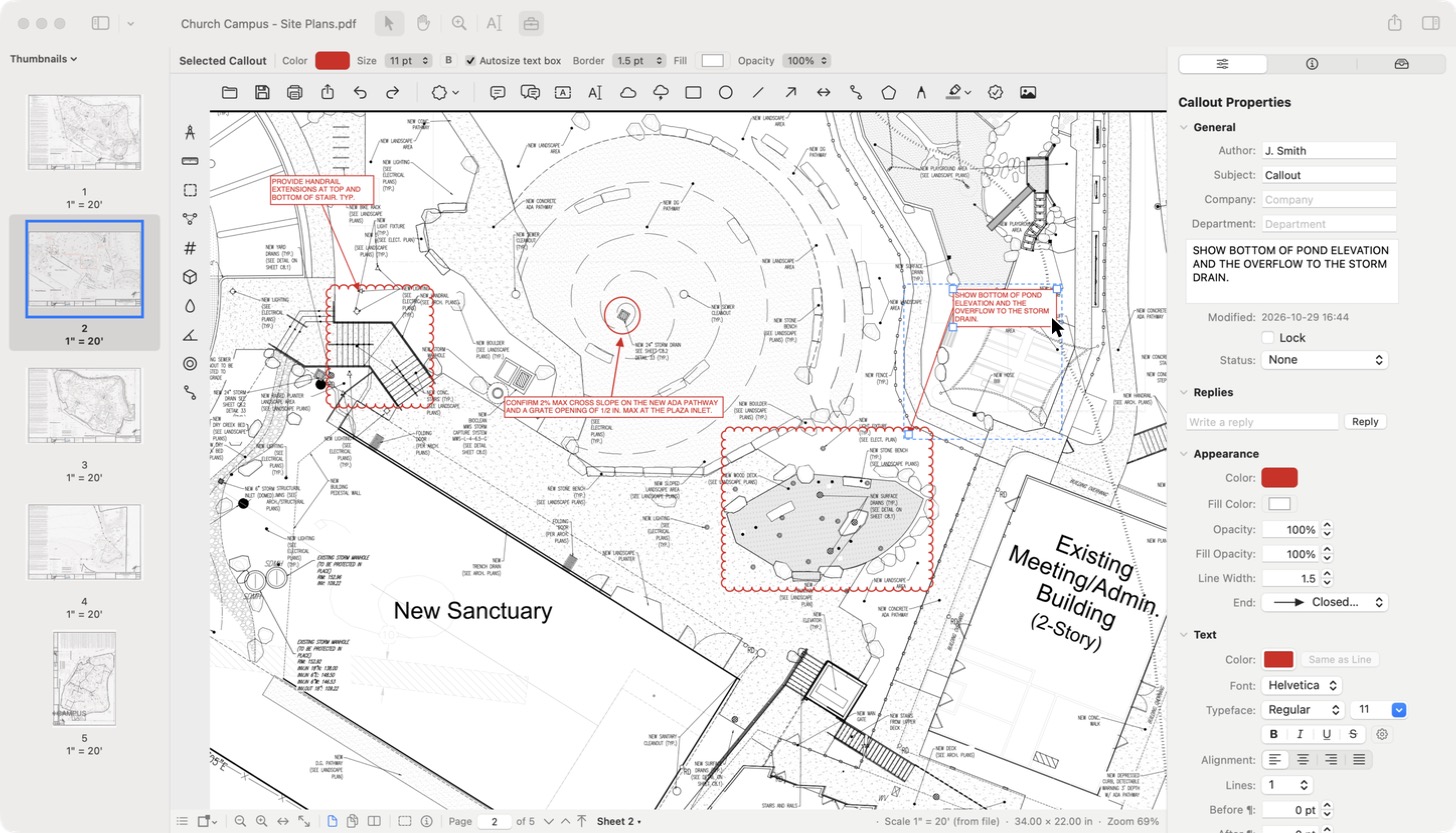
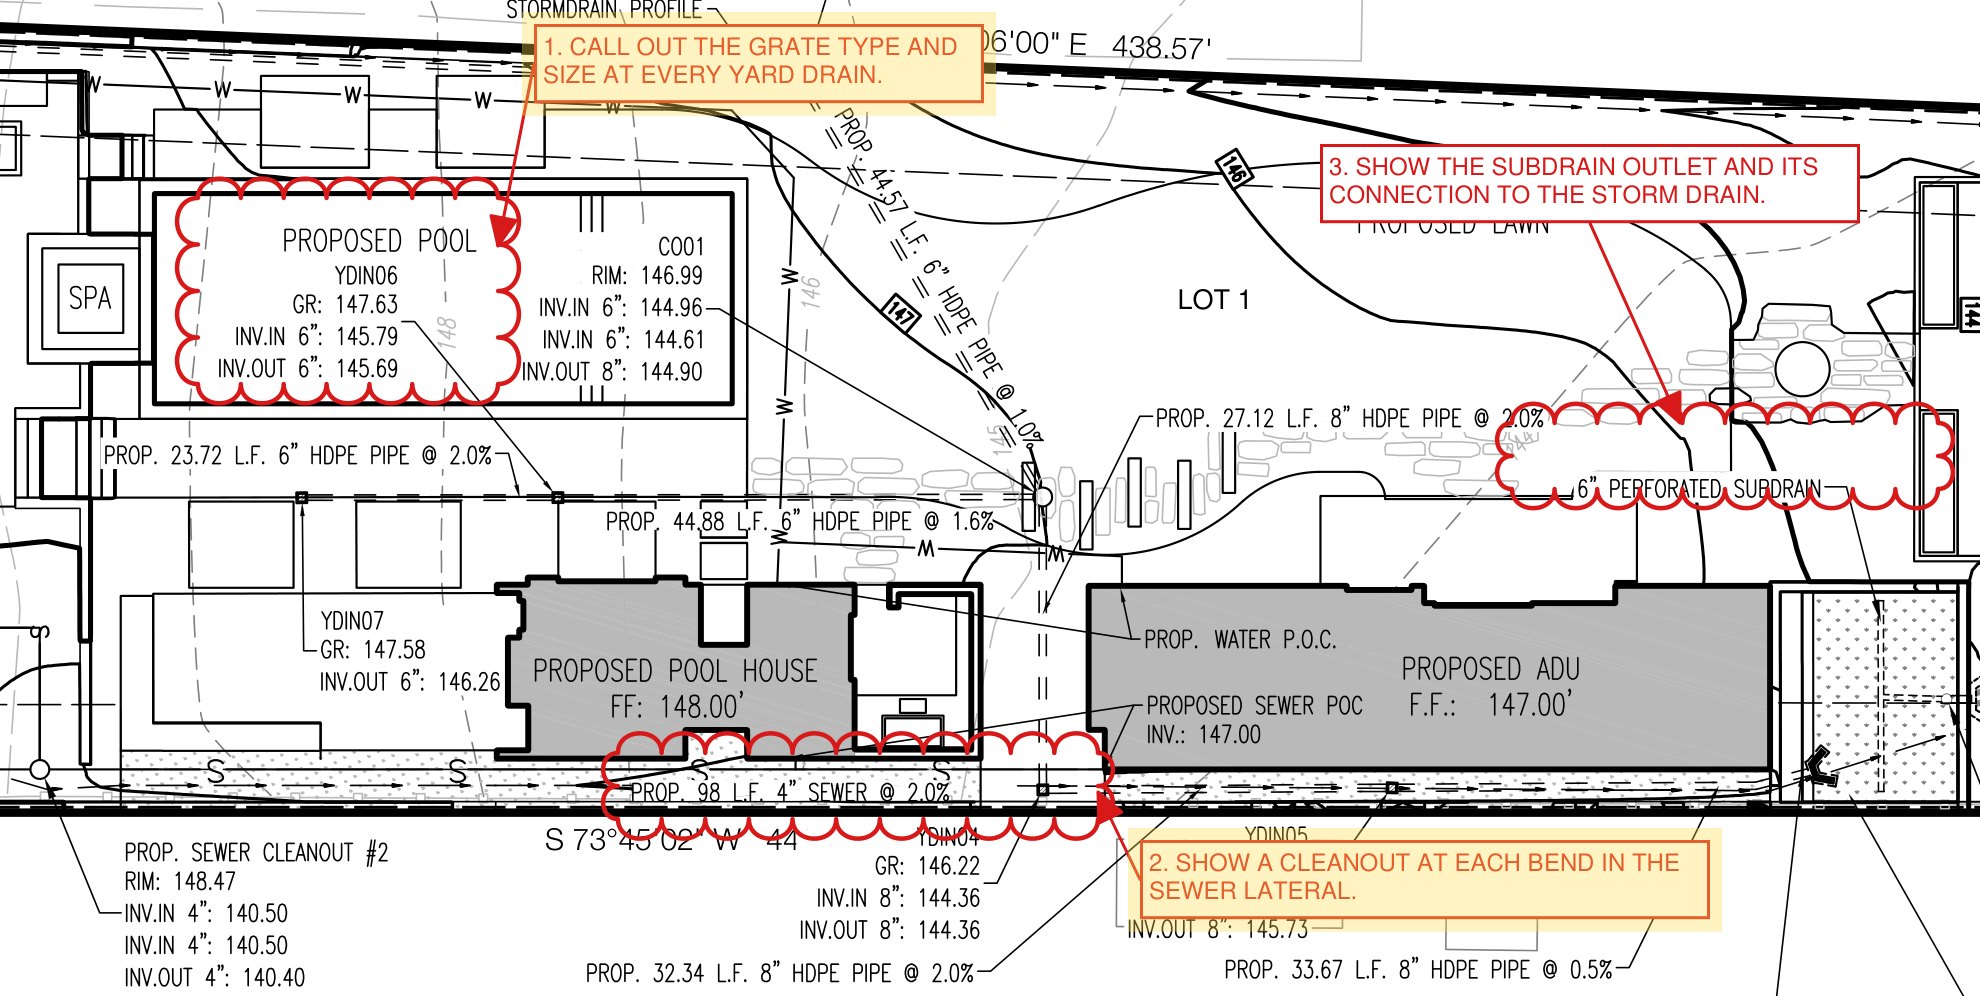
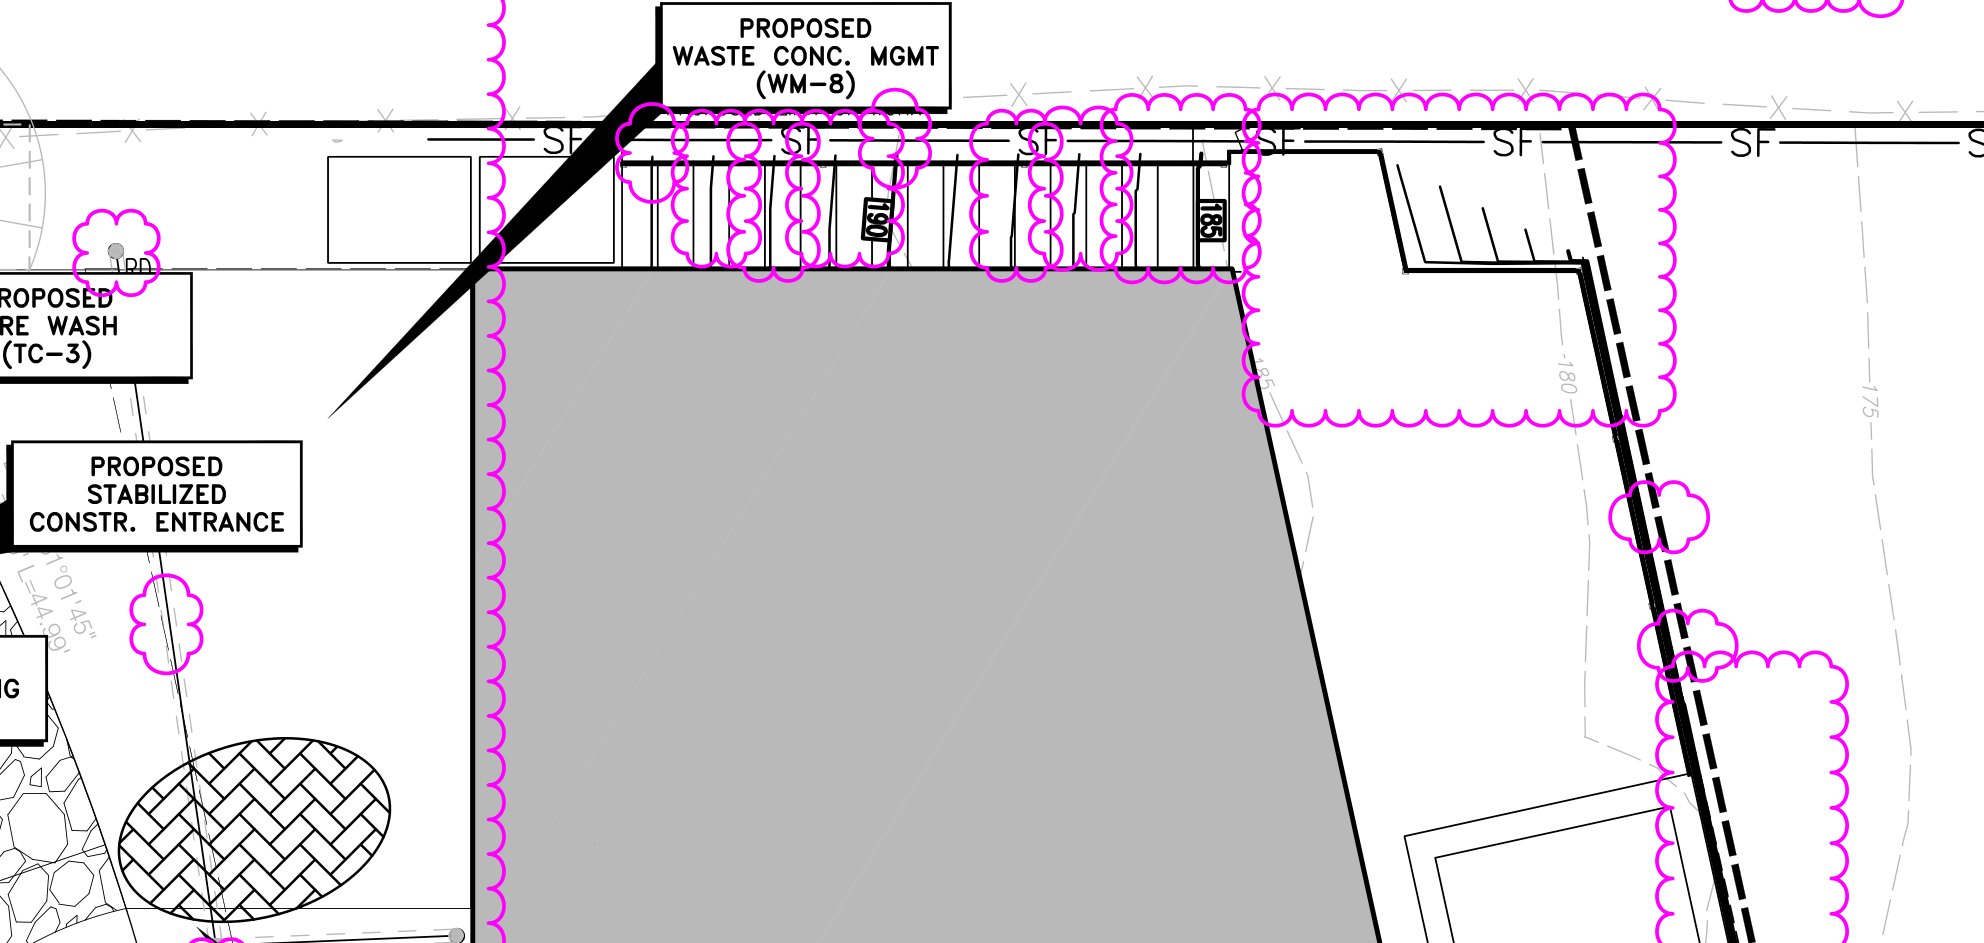
Clouds, Cloud+, callouts and a text box on a grading plan
Select and move around
Select VClick a markup to select it, Shift-click to add more, or drag a box around several. Drag to move, drag a grip to reshape. Arrow keys nudge the selection (Shift for bigger steps). Dragging the empty sheet moves it; while you drag, the pointer becomes a closed hand.
Pan ⇧VDrag the sheet. Holding Space, or dragging with the middle mouse button, does the same with any tool.
Zoom ZClick to zoom in, Option-click to zoom out, or drag a box to zoom to it.
Select Text ⇧TSelect the sheet's own words to copy them.
Snapshot GDrag a box to copy that part of the sheet as a picture.
Text and comments
Callout QClick the point, then drag the text box. The leader follows when you move the box; right-click to add or delete leaders.
Callout Plus ⇧QA speech bubble with a tail. Drag the tail's tip, its base width and the corner rounding by their grips; Properties sets a drop shadow (blur, offset, opacity, angle and color). Every PDF viewer shows it as drawn.
Text Box TDrag a box and type. Font, size, alignment and border are in Properties. ⌥Z fits the box to its text.
Typewriter WClick and type, with no box or border: for filling in forms and title blocks.
Cloud CClick the corners of the area, or drag a box. Arc Length, in Properties or the option bar, sets how big the bumps are.
Cloud+ KA cloud with a callout in one step: draw the cloud, then click where the text goes.
Shapes and lines
Rectangle · Ellipse REDrag. Hold Shift for a square or circle.
Line · Arrow LAClick both ends. Line styles include your CAD linetypes, labeled for water, sewer, gas and force main; arrowheads are set in Properties.
Dimension DClick two points, then move to set the offset and click. The length is written at the sheet scale.
Polyline · Polygon P⇧POne click per corner. While drawing, press A to draw an arc (click a point on the curve, then its end) and L to go back to straight segments. Edit them as in CAD: drag a vertex grip, drag a segment's middle bar to add a vertex there, right-click a corner to add or delete a vertex, or turn any segment into a true arc and drag its middle grip to set the bow. Hover a grip for its menu. A right-click, or a click on its first point, finishes a polyline closed; a double-click, Return or a click off the sheet finishes it open. Properties › Closed opens or closes it later. A closed polyline becomes a shape that can take a fill and a hatch, and keeps its subject (such as Property Line) and its line style. Untick Closed to open it again; that removes the fill and hatch. With a scale set, Properties shows the area of any closed shape (polygon, rectangle, ellipse or cloud), and it follows the scale when the scale changes.
HatchClosed shapes (rectangles, ellipses, polygons, closed polylines and areas) take CAD hatch patterns from Properties. Hatch Color gives the hatch its own color; Same as Line uses the markup's color. Hatch Scale is a slider with a number box, so you can type any scale up to 1000.
Pen IFreehand, with a round marker, chisel highlighter or crayon tip.
ImagePlace any picture file.
A selected polyline: vertex grips, middle grips, one arc segment
Highlight, stamps and close-out
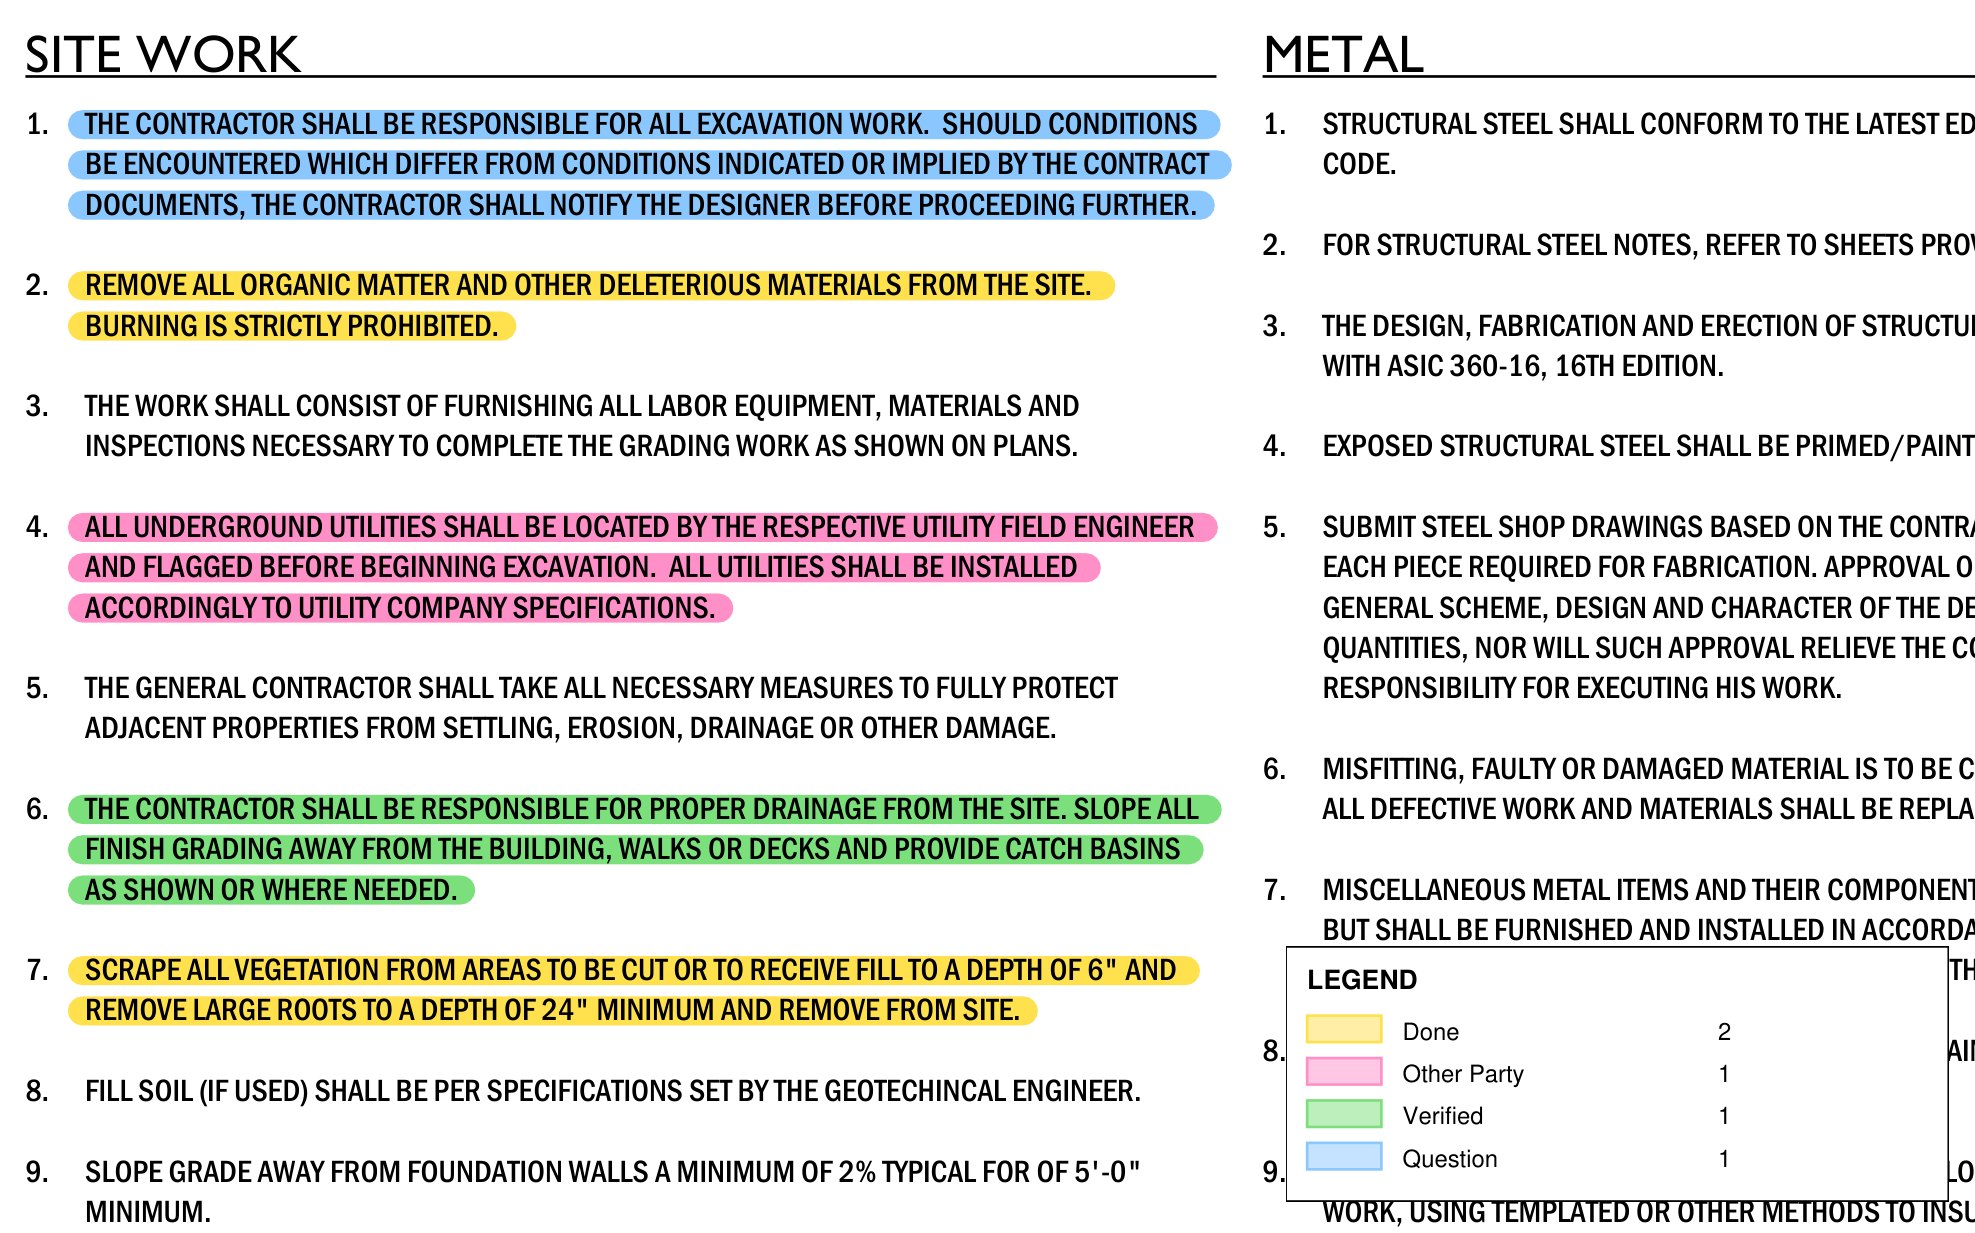
Highlight HOver sheet text it snaps to the words. Hold the button or right-click it for Highlight+: colors that mean something, such as Done (yellow), Other Party (pink), Verified (green) and Question (blue). Edit Highlight Colors… renames, recolors or adds them. Picking a plain color in the option bar instead sets the color of the next strokes, whatever Highlight+ color was in use.
Mark CompleteClick any markup: its status becomes Completed and a see-through box in the Done color is laid over it, or, if you choose the scribble look, a highlighter scribble that follows the markup's own lines.
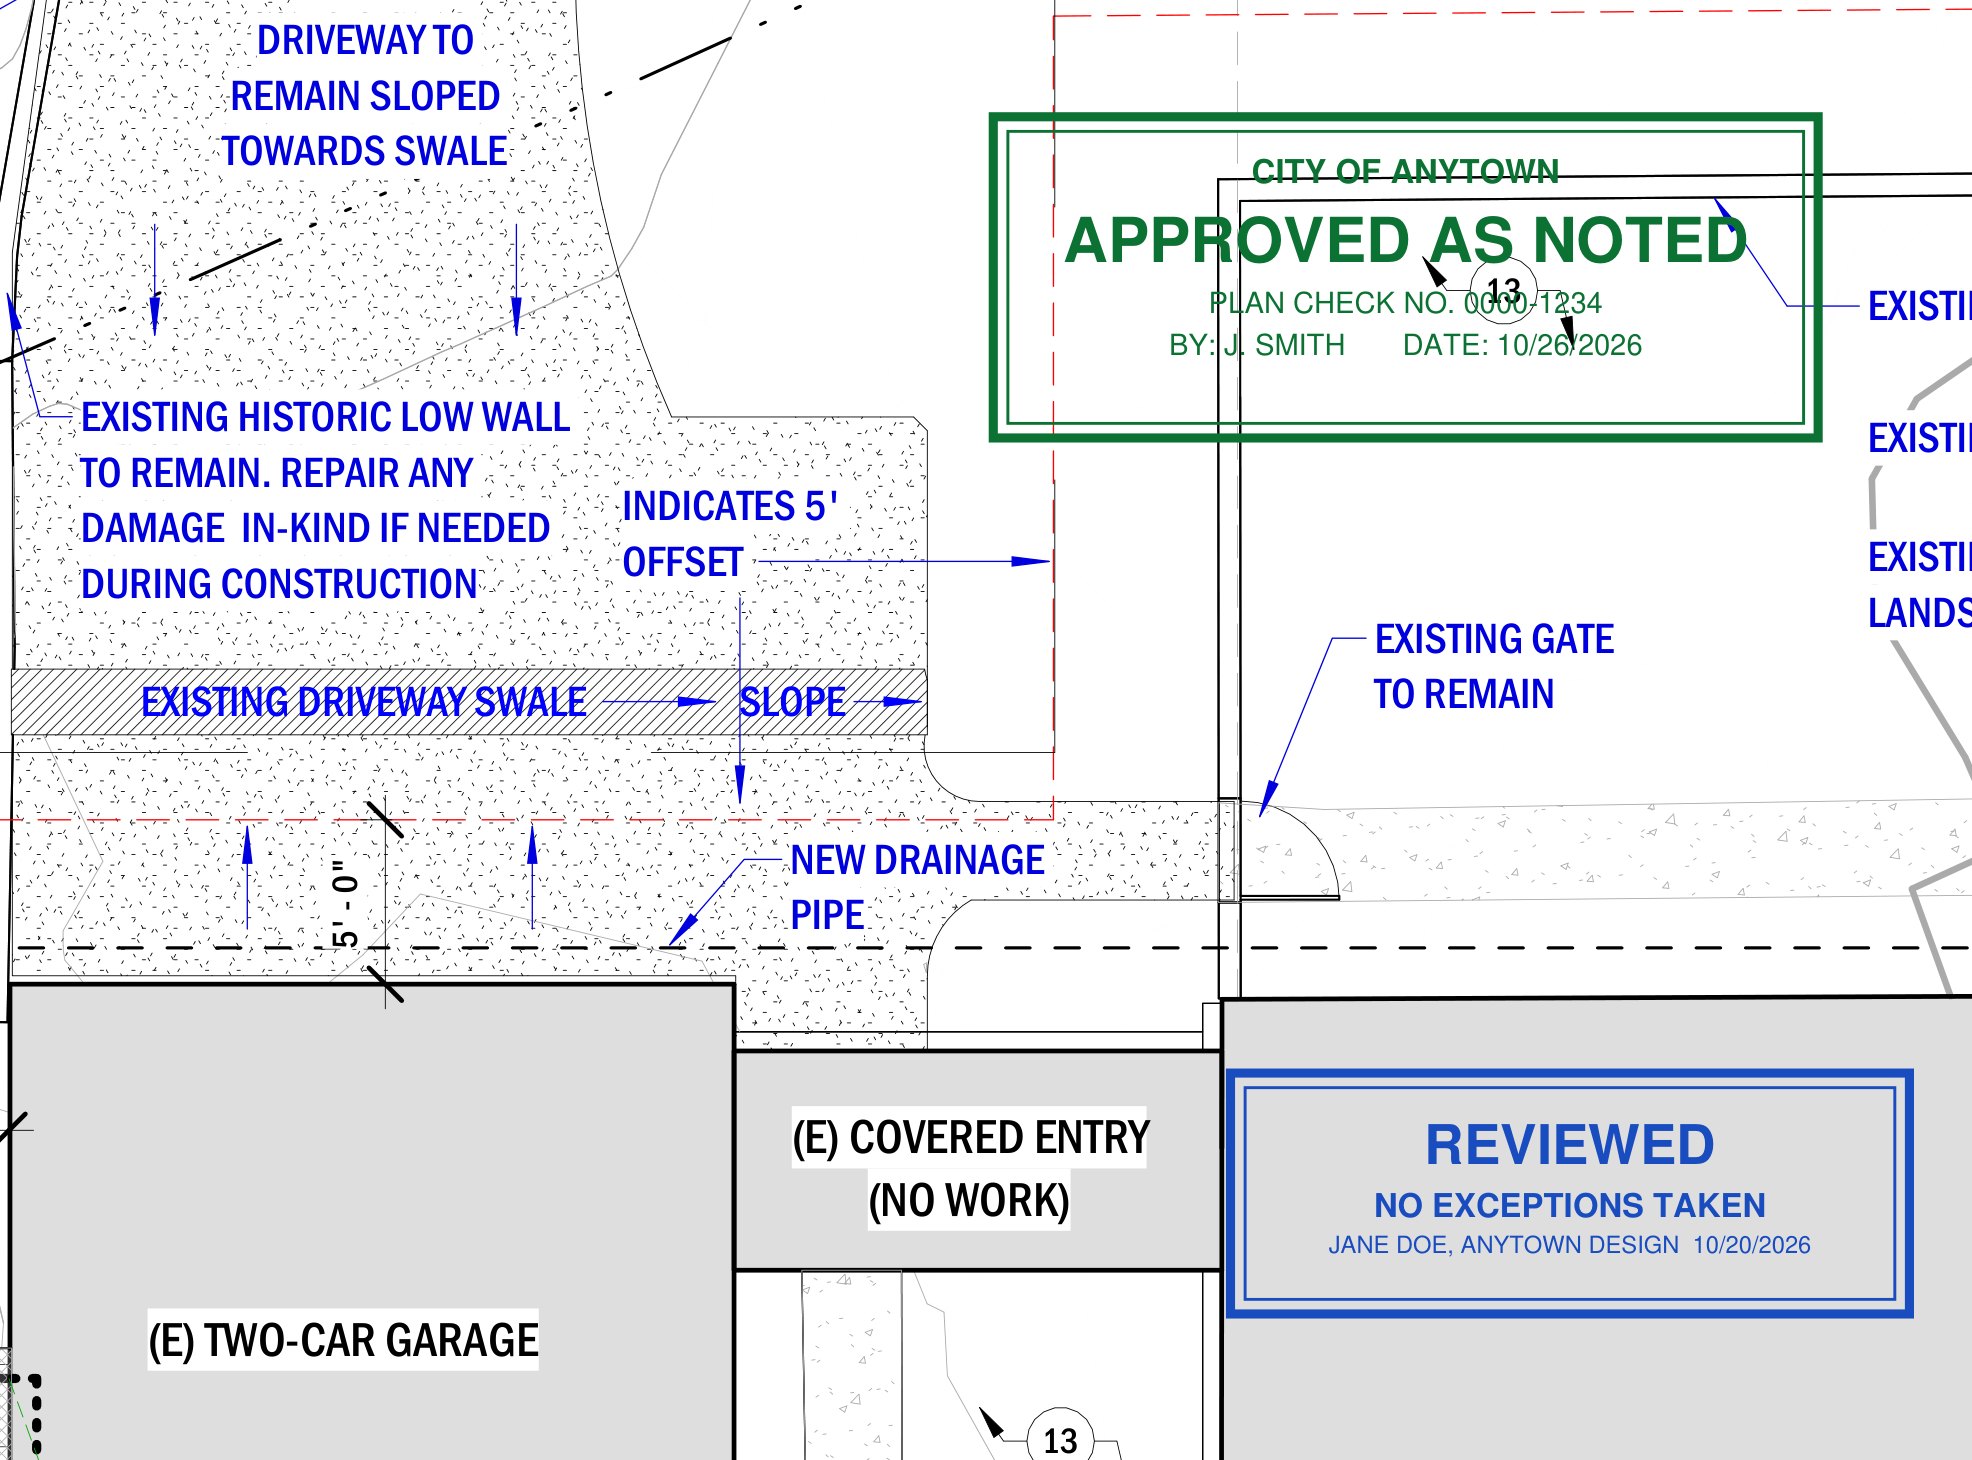
Stamp SPick a stamp from the Stamps button, click to place it at its own size or drag to size it. Import Stamp… adds any PDF or picture; your stamp folder (Documents › Marqup › Stamps to start, with fourteen starter stamps) can be moved to a shared drive for the whole office. Any picture dropped in the folder works as a stamp. New Text Stamp makes a word stamp; New Stamp from Image trims a picture to its ink, so a signature signed on a blank page in Preview becomes a stamp. Stamps keep their shape as you size them; hold Shift to stretch.
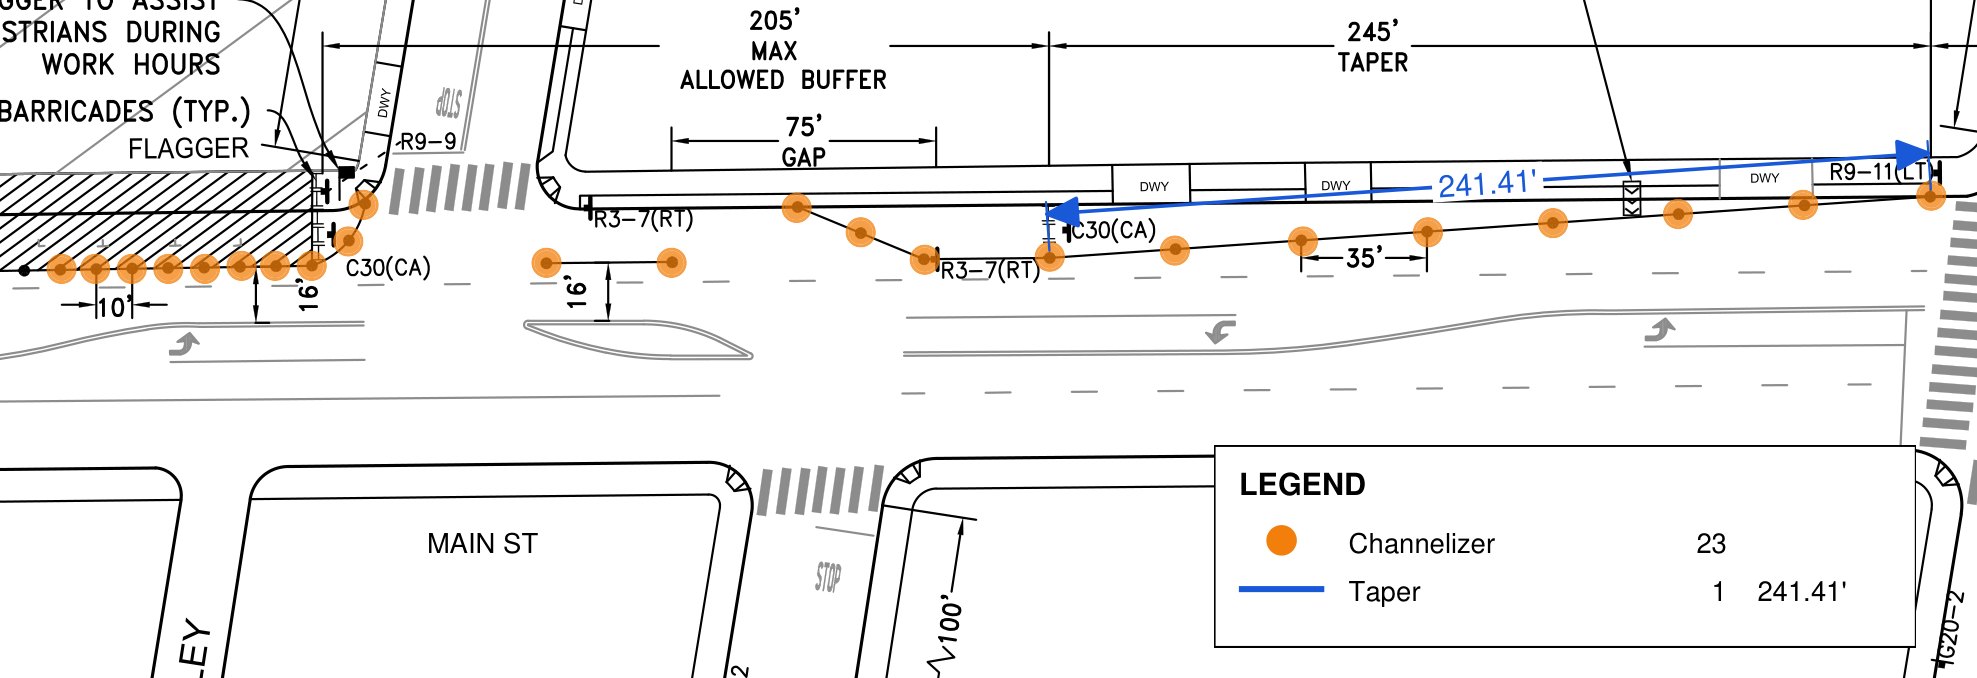
LegendDrag a box: it lists every kind of markup on the sheet with its count and total, and updates as you work. Highlight+ colors appear by name.
HyperlinkDrag a box, then choose a sheet or type a web address.
Punch list
Punch ItemMarkup › Punch Item, then click the sheet and type the item and who it's for. Each item is numbered.
Responsible partySet it in Properties, or right-click › Responsible Party. The Markups List has a Responsible column to sort and filter by.
PhotosRight-click › Add Photos… adds up to 3 photos to an item. Marqup keeps them hidden inside the PDF, or in a folder named after the file with Photos on the end, beside it. A small picture icon shows on the item; View Photos opens them.
Punch List windowMarkup › Punch List… lists every item: tick them done, and sort By Sheet or By Responsible Party.
ExportA PDF report (a clip of the sheet with each item circled, plus its photos), an Excel list, or a web page people tick off and Send Back.
Check-offsWhen a web page comes back, Check-offs › Paste Check-offs or Load Check-offs File… marks those items done.
Symbols
The Tool Chest holds 260 drawn symbols in seventeen libraries, all clean vector drawings: Annotation, North and Scale, Grading and Drainage, Utilities and Survey, Architecture, Landscape, Construction, Review Stamps, Storm Drain, Water and Utilities, Trees, Site, Interiors, Electrical, Mechanical, Plumbing and HVAC.
Place a symbolClick it in the Tool Chest, then click the sheet; drag instead to size it. Symbols keep their shape as you size them.
Real sizeA symbol whose name ends with its size, such as Queen Bed (60 x 80 in), lands at that true size on a scaled sheet, so furniture, fixtures and equipment can be laid out to check clearances. The Interiors library (beds from twin to California king, sofas, tables, desks, rugs, storage) and the Plumbing fixtures are drawn this way. The sheet needs a scale first (read from the sheet, set or calibrated); without one the symbol places at its drawn size.
ColorLibrary Manager › Color (or the color button in the Library panel) sets the color symbols are placed in, from the same color grid and wheel as Properties; Place symbols as drawn keeps them black.
FavoritesRight-click a symbol › Add to Favorites to keep it in the first tile.
Your own symbolsImport a folder of PDFs, pictures or DXF and DWG drawings in the Library Manager and it becomes a library of its own. To add to a library you already have, drag files onto it or choose Add Items….
DXF and DWG drawingsA DXF or DWG file dropped into a library becomes a clean vector symbol, as sharp as the original linework at any zoom. DXF files work on their own. DWG files need the free ODA File Converter installed on the Mac; Marqup uses it in the background to read them.
Highlight+ colors with a LegendImported review stamps (names made up)
Smart symbols
The annotation symbols in the libraries are smart: construction note hexagons with a number and a leader arrow, revision deltas, grid bubbles, detail, section and elevation callouts, door, room and wall tags, spot elevations, and slope and flow arrows. Each one places as a group that stays together, so its frame, words and leader move as one piece.
Change the numberDouble-click the words or number in the symbol and type the new one, such as 7 in place of 12. Press Esc or click outside to finish.
Point the leaderSelect a construction note and a round yellow grip sits on the end of its arrow. Drag the grip: only the arrow end moves, and the start of the leader slides around the hexagon so it always leaves from the side that faces the arrow. The hexagon itself stays where it is.
Move or size itDrag anywhere else on the symbol to move it; drag a corner of its box to size it. The pieces keep their places within it.
Graphic scalesA graphic scale symbol reads the scale of the sheet it is placed on and labels itself to match, and redraws if the sheet's scale changes.
Text options
Font · TypefaceProperties › Text: Helvetica, Times or Courier, the fonts every PDF reader has, in Regular, Bold, Italic or Bold Italic, at any size.
B · I · U · SBold, italic, underline and strikethrough.
More optionsThe gear button: character spacing, baseline shift, capitalization (All Caps, Title Case), outline, and a text background color behind the words.
Text colorProperties › Color colors the words apart from the box's line. Same as Line puts them back.
AlignmentLeft, center, right or justified.
SpacingLine spacing, and space before and after each paragraph.
Bullets & listsBullets, dashes, numbers or letters, with the indent from the marker to the text.
Box too small?Text that does not fit is cut off at the box's edge. Make the box bigger, or turn on Autosize text box in the option bar.
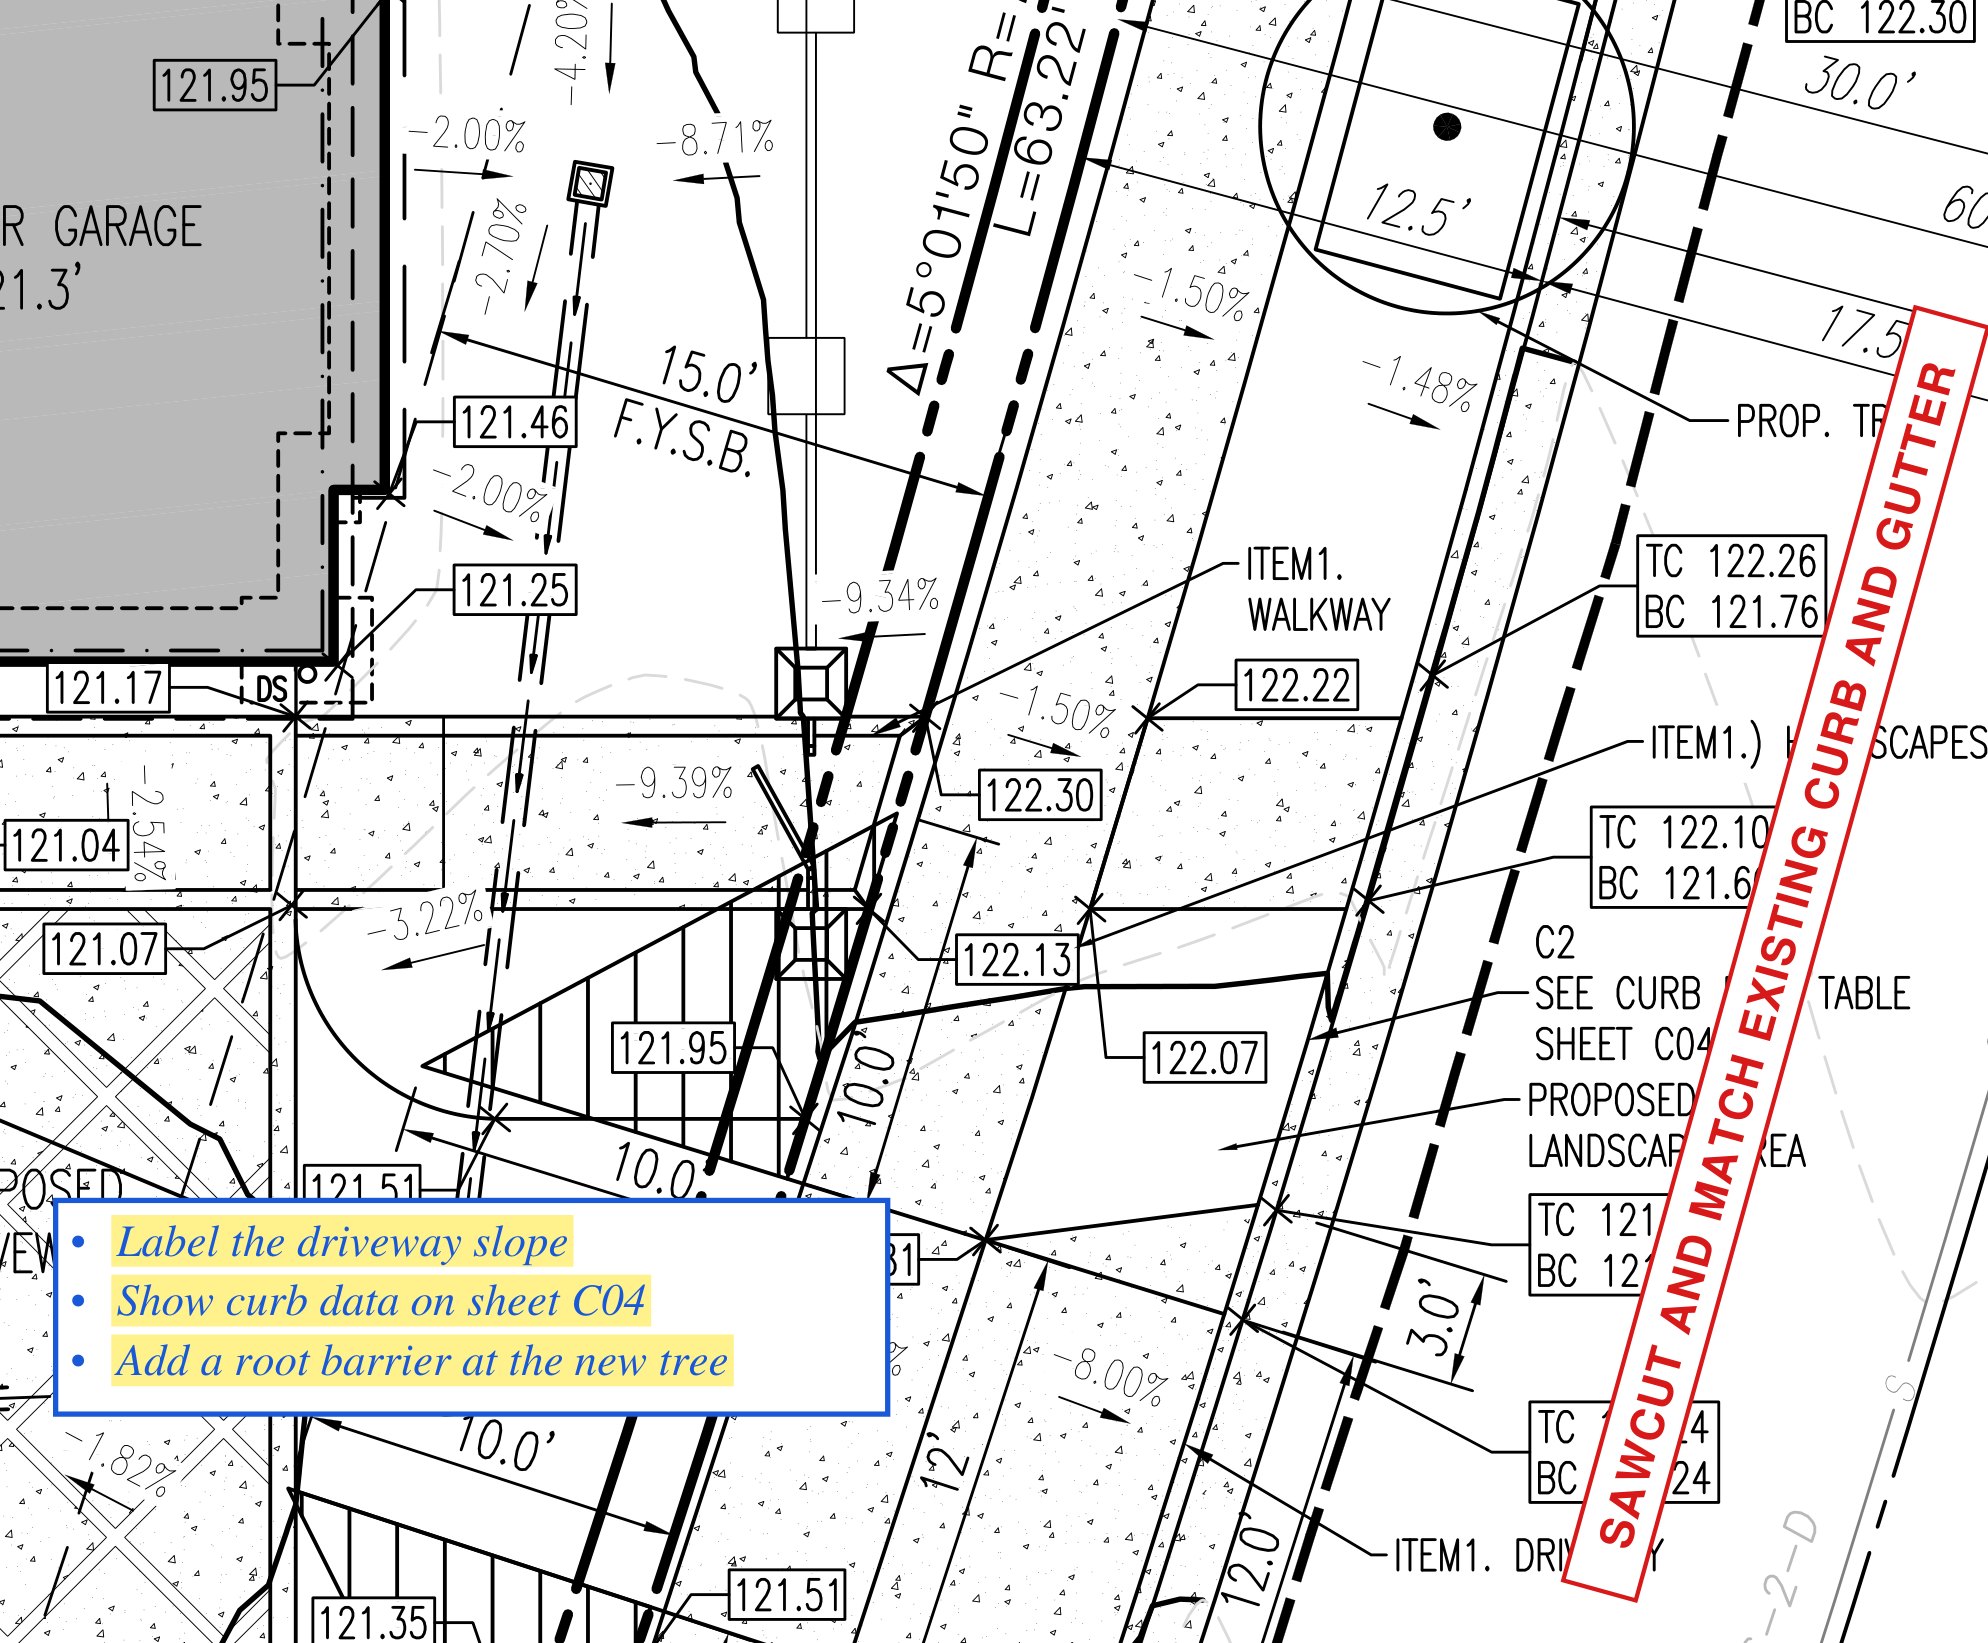
A rotated text box along a street; bullets, Times italic and a text background
Edit any markup
PropertiesColor, width, fill, opacity and line style. Each color button has two halves: click the color for a grid of swatches (six colors in four shades, grays, and No Fill for fills and backgrounds), or the color wheel for any other color. Set as Default makes the next markup of that kind match; Add to Tool Chest saves it to place again.
Right-clickStatus, lock, draw order (⌘]⌘[), copy and delete.
Select Similar ⇧⌘ARight-click a markup › Select Similar: every markup of the same type and color, or the same type, on this sheet or on every sheet. Change them all at once in Properties or the option bar. Edit › Select Similar picks same type and color on every sheet.
Group · Ungroup ⌃⌘G⌃⇧⌘GSelect two or more markups on a sheet and group them: a click on any one selects them all, and they move together. Groups are saved the standard PDF way, so other markup apps keep them too.
Group boxWith several markups selected, one box surrounds them all. Drag a corner grip to resize them together (Shift keeps the proportions) or a side grip to stretch them one way.
Align · DistributeRight-click › Align: line up left edges, centers, right edges, tops, middles or bottoms, or space three or more evenly across or down. A group moves as one piece.
RotateText boxes and typewriter text: move just outside a corner and drag. It turns in 15° steps, or 1° with Shift. Then type an angle and press Return to set it exactly. Right-click › Rotate also has Rotate…, 90° left and right, Reset, and Align to a Line on the Sheet (click the line the text should run along).
Lock ⇧⌘LA locked markup cannot be moved or changed until unlocked.
Apply to PagesRight-click › Apply to Pages… copies the selected markup to other pages (for example 1-3, 6), such as a stamp on every sheet.
Aligned, distributed and grouped notes with the group box
05Measuring
Measure at scale
Sheets plotted from CAD carry their viewport scale, and Marqup reads it: a measurement on a 1" = 10' sheet reads in feet as soon as you draw it. Where a sheet has no scale, Marqup reads the scale printed on the sheet.
Read Scale from Sheet (⇧⌘K, or Read… in Properties) finds scale notes such as 1" = 20' and checks them against the scale bar. It is offered on its own the first time you measure an unscaled sheet; you confirm before it applies.
Set Scale types a scale in, for one sheet or every sheet.
Calibrate (⇧K): click both ends of a known length, such as a dimensioned property line, and type the real length.
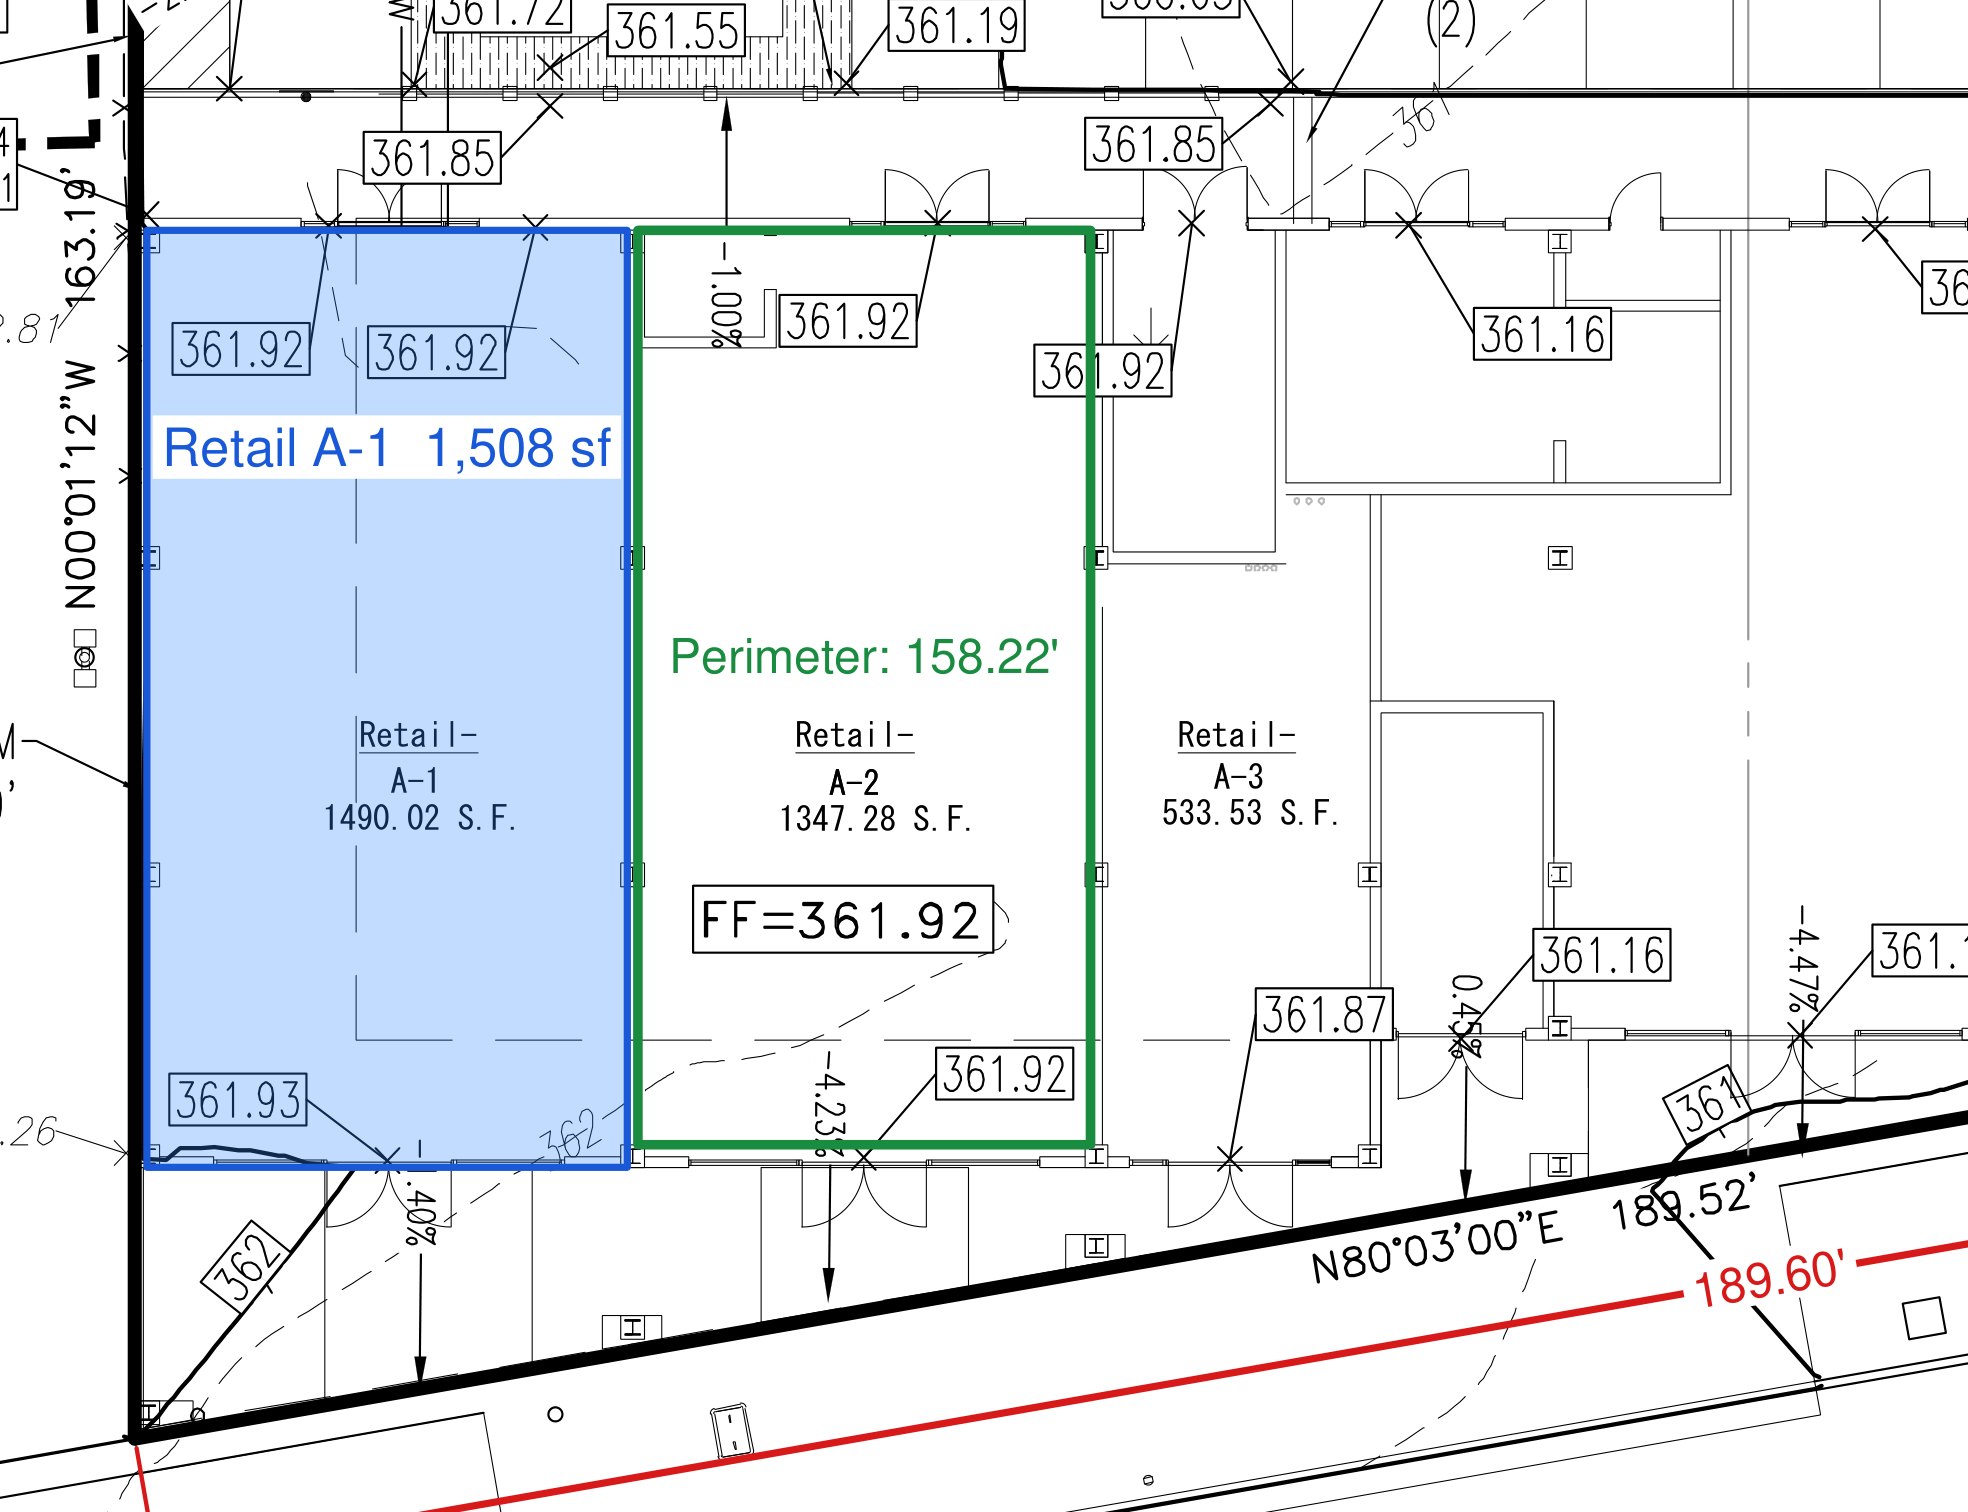
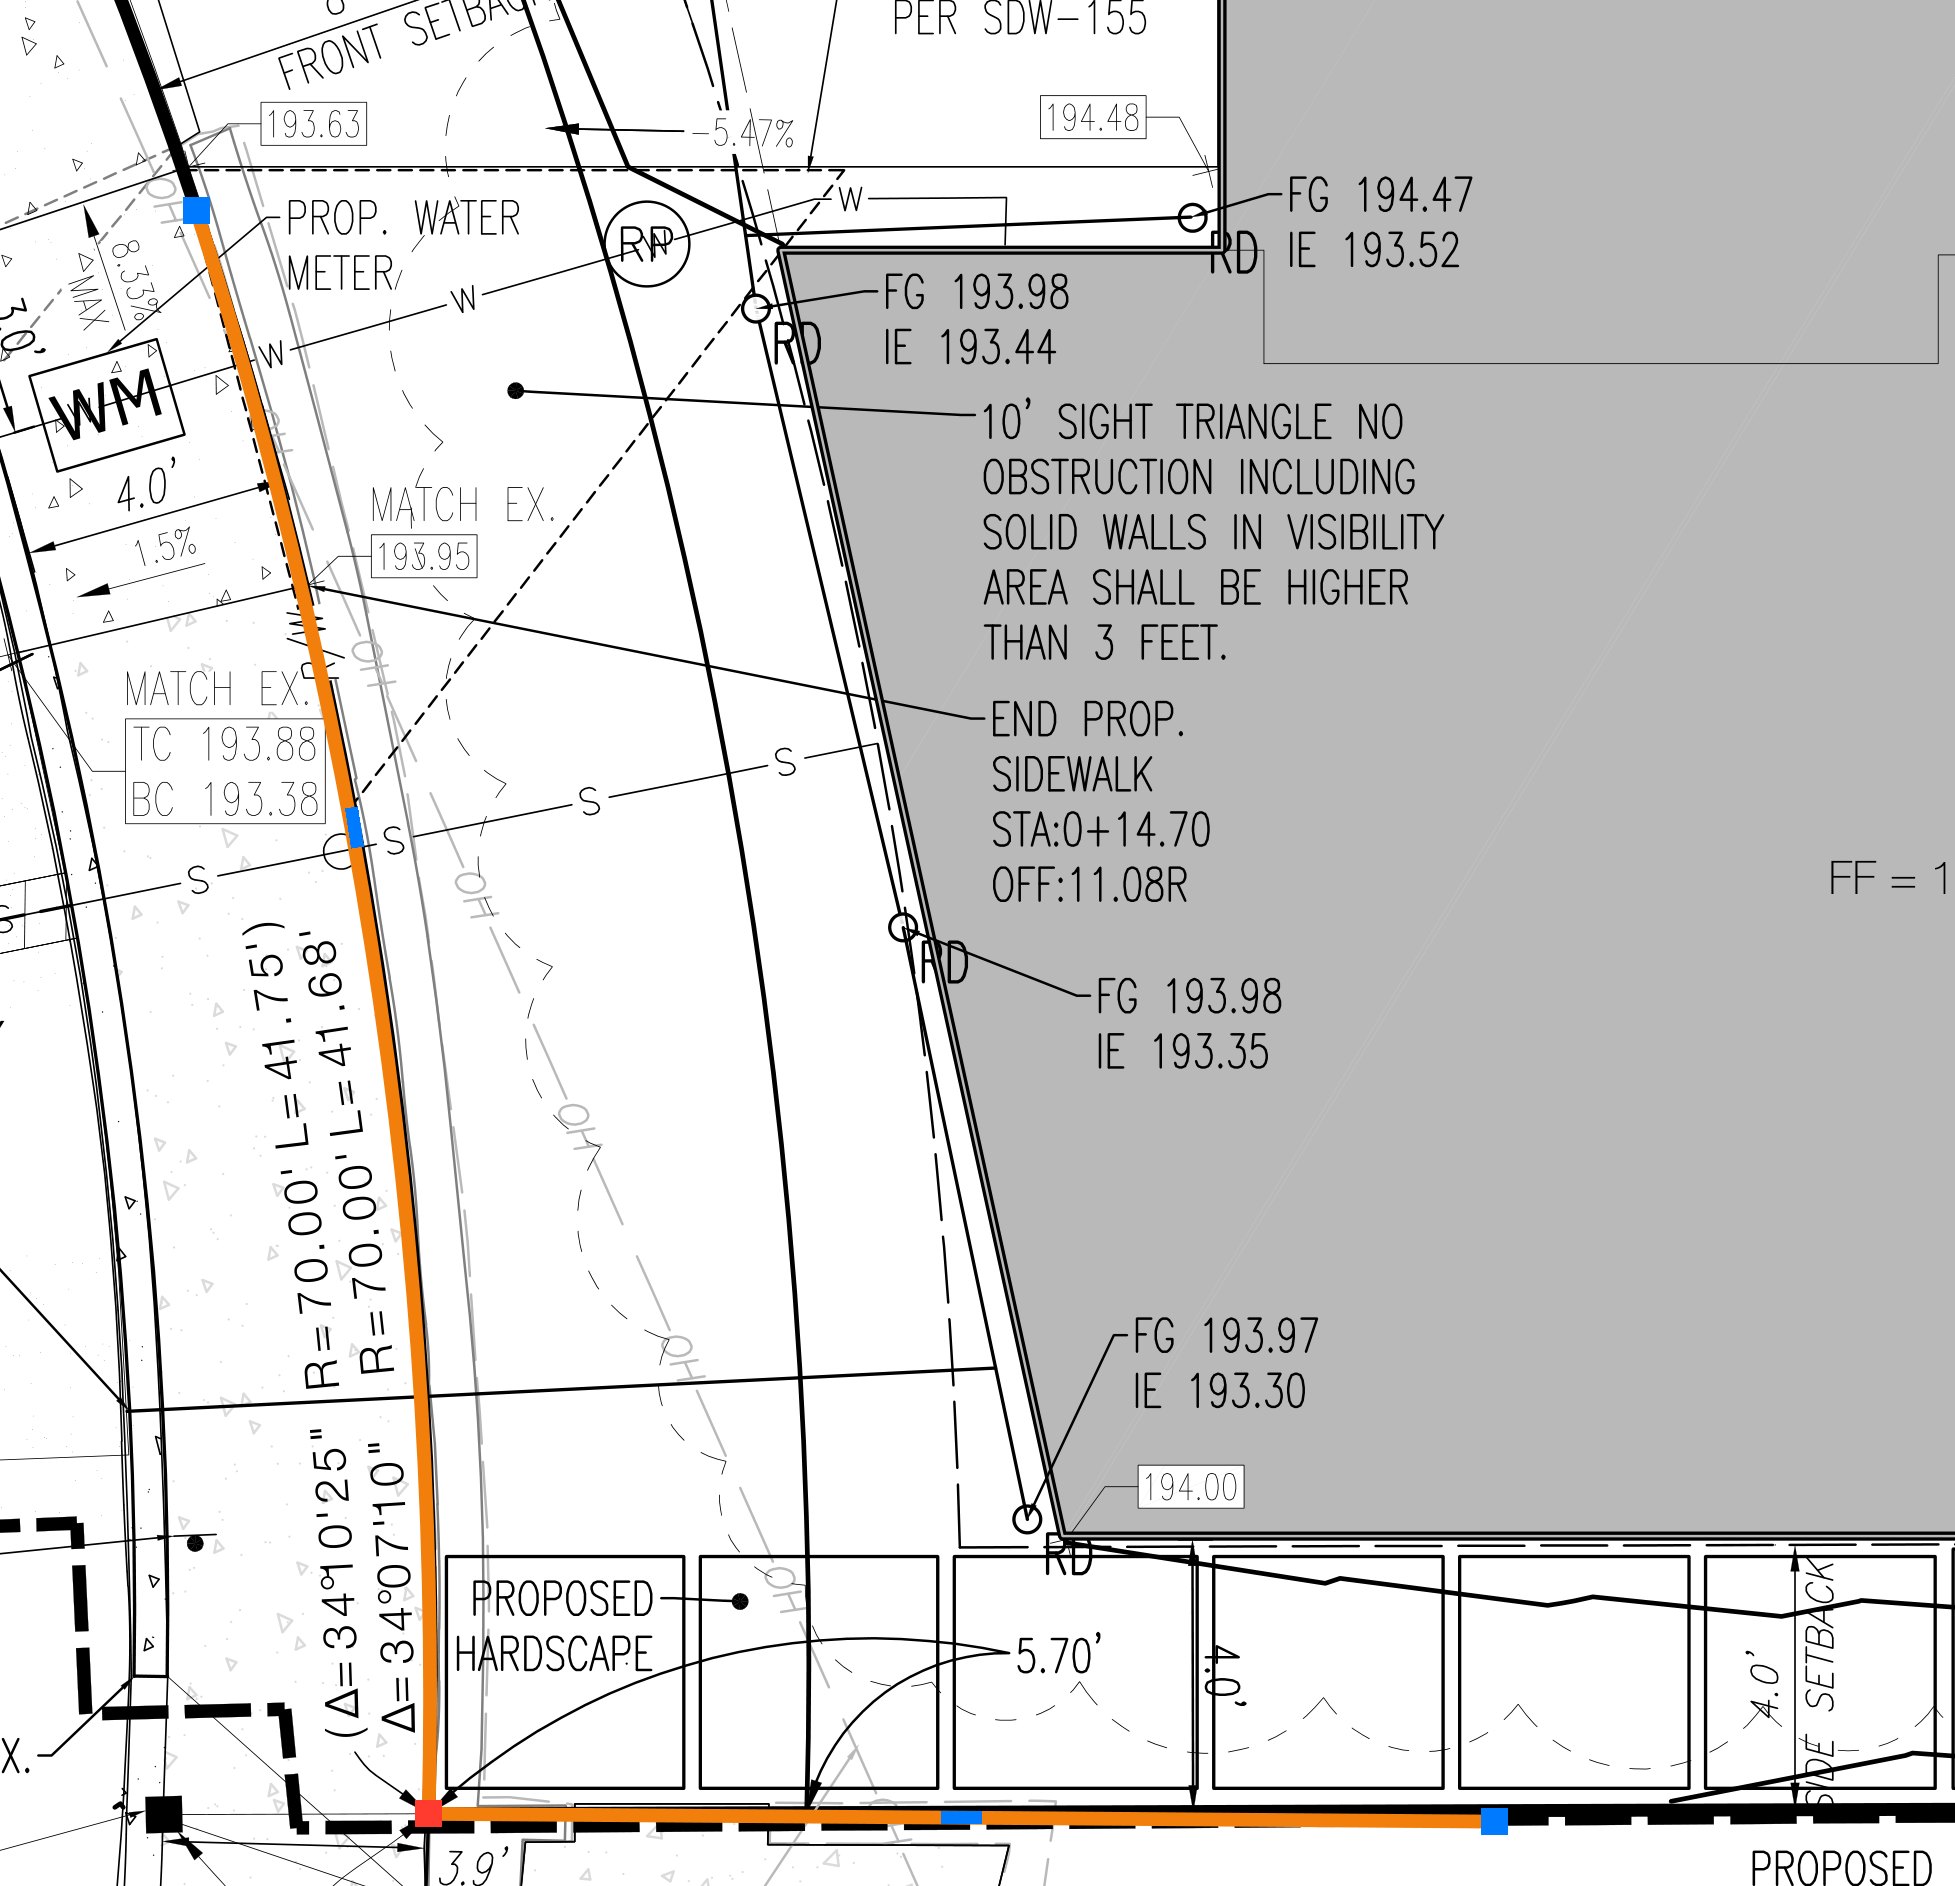
Area, perimeter and length at a scale read from the sheet
Length ⇧⌥LClick along the path; the total shows as you go.
Area · Perimeter ⇧⌥A⇧⌥PClick the outline. Double-click the label to change the words before the value, such as Lot 3 area.
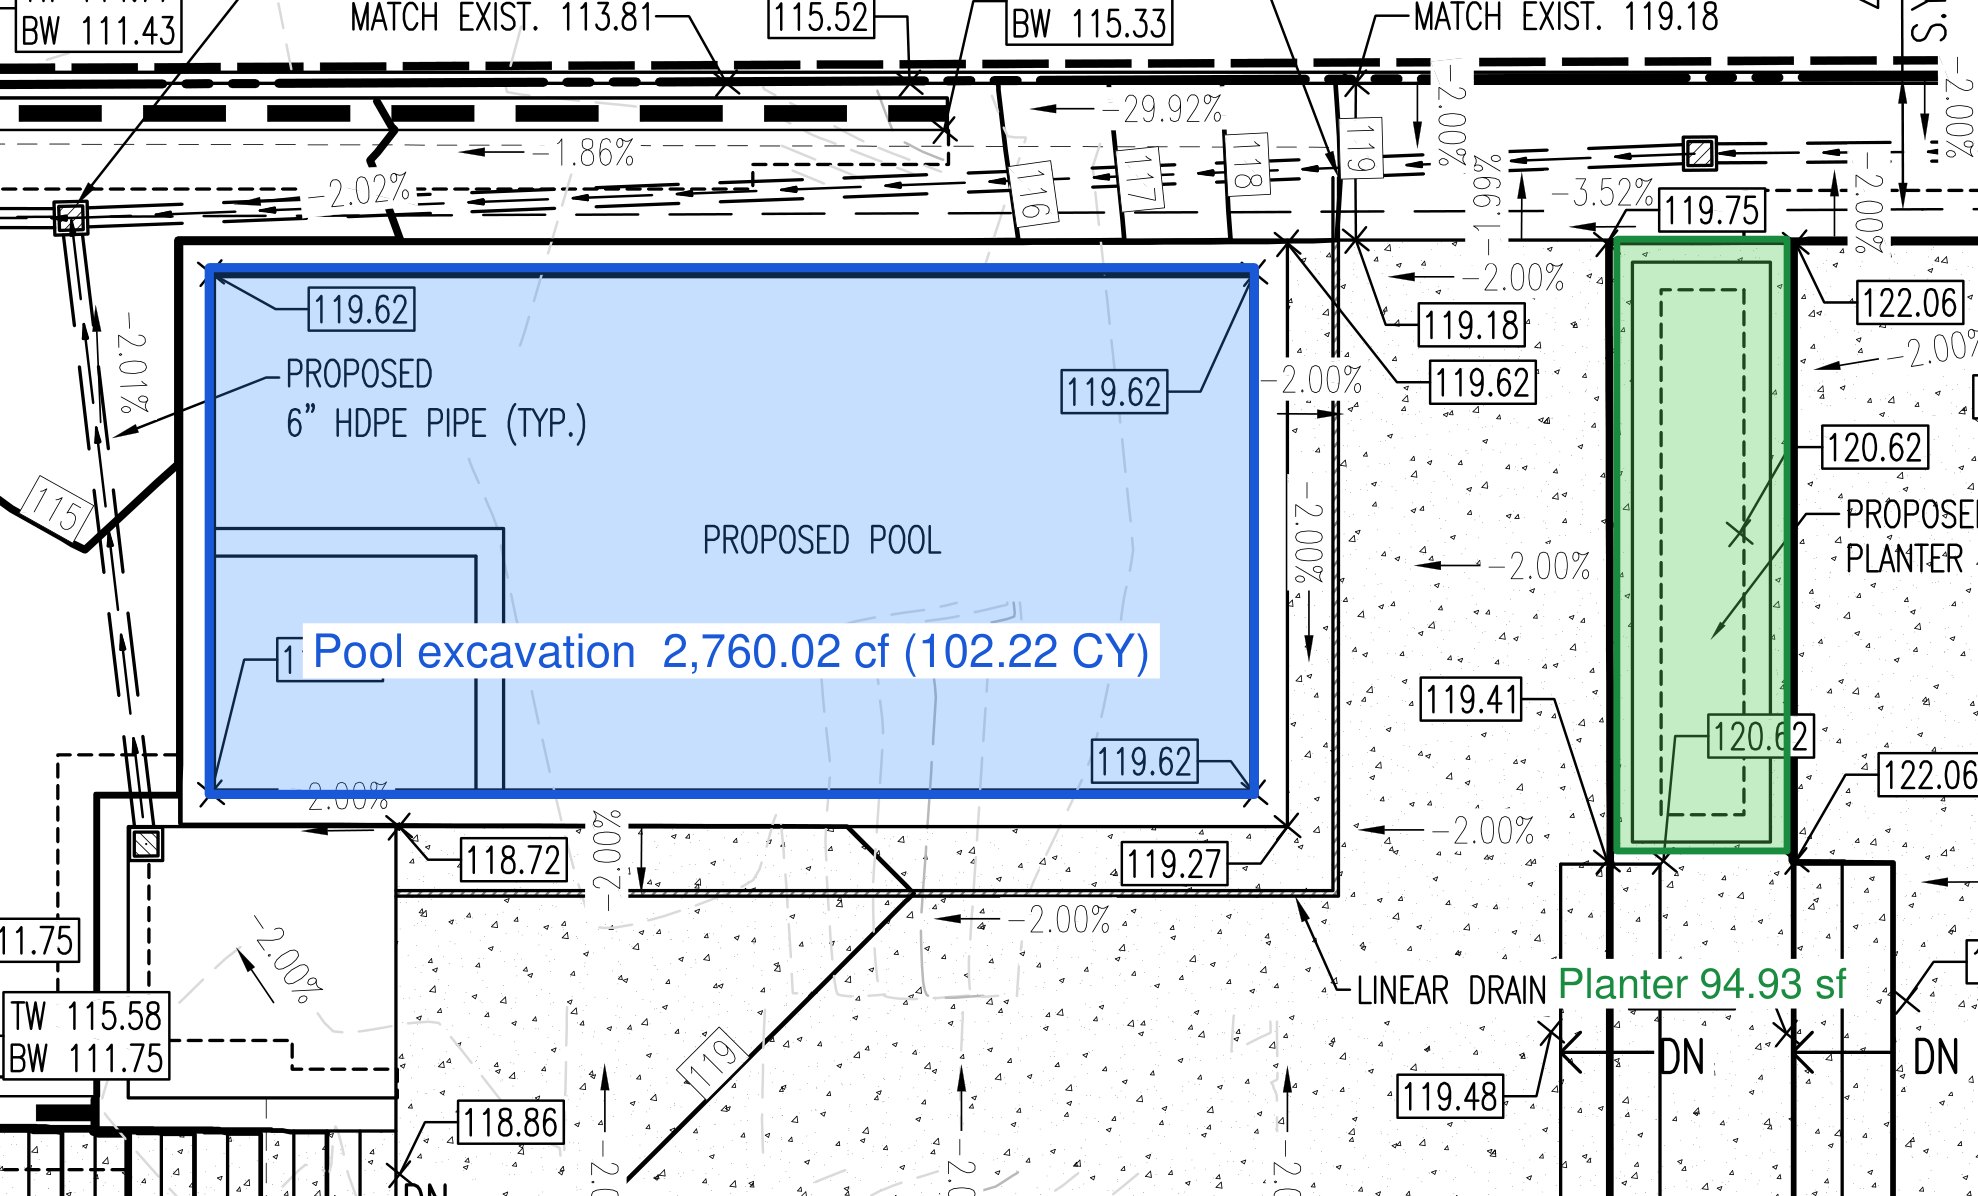
Volume ⇧⌥VDraw an area, then enter a depth. Reads in cubic feet and cubic yards.
Dynamic Fill ⇧⌥FClick inside any closed outline drawn on the sheet, such as a building pad. Marqup traces it and measures it exactly.
Count ⇧⌥CClick each item: trees, cleanouts, inlets.
Angle · Radius · Arc ⇧⌥G⇧⌥R⇧⌥JThree clicks for an angle; three points on a curve for its radius or arc length.
LegendMeasure › Legend, then click: a box listing every kind of markup on the sheet with its swatch, count and total. It updates as you work.
DropIn Properties, a length can add a drop at each vertex, for pipe and conduit runs.
UnitsSettings › Measure: feet, inches or meters; decimal feet, or feet and inches with fractions to 1/16"; and the number of decimals.
Volume in cf and CY; a planter by Dynamic FillCount, a length and a Legend
Object snap: while drawing or measuring, the pointer snaps to endpoints, midpoints, intersections, perpendiculars and nearest points of the sheet's own linework, with a green CAD snap marker. F3 turns it on or off, as in CAD; hold Control to place a point freely. Right-click the Snap button in the option bar to turn single snap modes on and off.
06Reviewing
Track every comment
StatusRight-click a markup › Set Status: Accepted, Rejected, Cancelled, Completed. Mark Complete does it in one click.
Mark CompleteHold the highlighter button › Mark Complete, then click each comment that has been addressed. Its status becomes Completed and a see-through box in the Done color is laid over it (or, if you prefer, a highlighter scribble).
RepliesAdd a reply in the Properties pane, or right-click › Reply…. Each reply keeps its author and date.
Comment cardsRest the pointer on a box, cloud, line, pen mark or stamp that carries a comment the sheet does not show, such as an agency (ePlanSoft) review box: a card shows who wrote it, its status, the comment and its replies. Click anywhere inside the box to select it and keep the card; the x closes it. The speech-bubble button in the bottom bar turns the cards on and off.
Copy Comment TextRight-click a commented markup › Copy Comment Text: the author and the comment, with the review site's line wraps joined back into paragraphs, ready for a response letter.
Pictures in commentsPictures a reviewer pasted into an agency (ePlanSoft) comment show in the card under the text. Right-click › Open Comment Picture opens one full size.
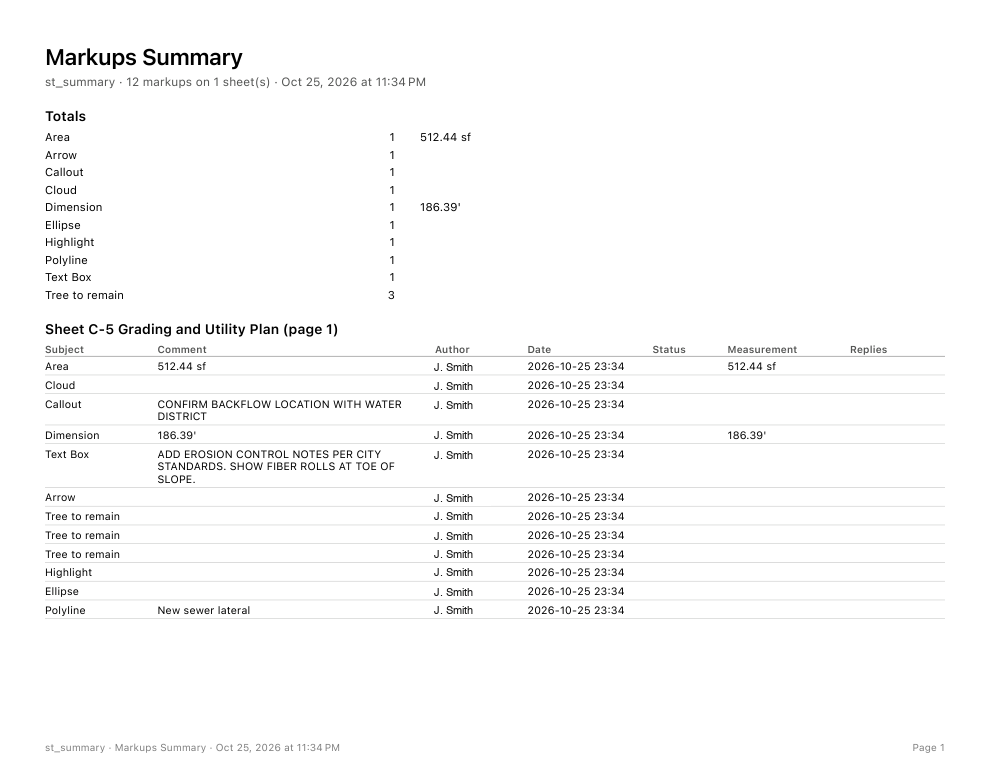
Markups ListShift-click or ⌘-click rows to select several, then change them together; right-click a row for Select Similar. Sort by any column; filter by sheet, author, status or type; click a row to go to the markup. The Authors button shows or hides each reviewer's markups, on the sheet and in the list, or only your own.
Company · DepartmentSet once in Settings › General. Every markup you draw carries them, so a multi-discipline review stays sorted.
Export⇧⌘E writes the list as a CSV. File › Export › Markups List (Excel) writes it for Excel, and Markups Report (Word) writes a summary with totals by type, ready to attach to a response letter.
Find ⌘F⌘G next, ⇧⌘G previous.
Comments 1 and 2 marked complete; comment 3 still openMarkups Summary
07Comparing revisions
What changed
Each command takes the older set and the newer set. Sheets are matched by label when both sets have labels, otherwise by page order. Revisions must be plotted at the same size and position, as CAD re-plots are.
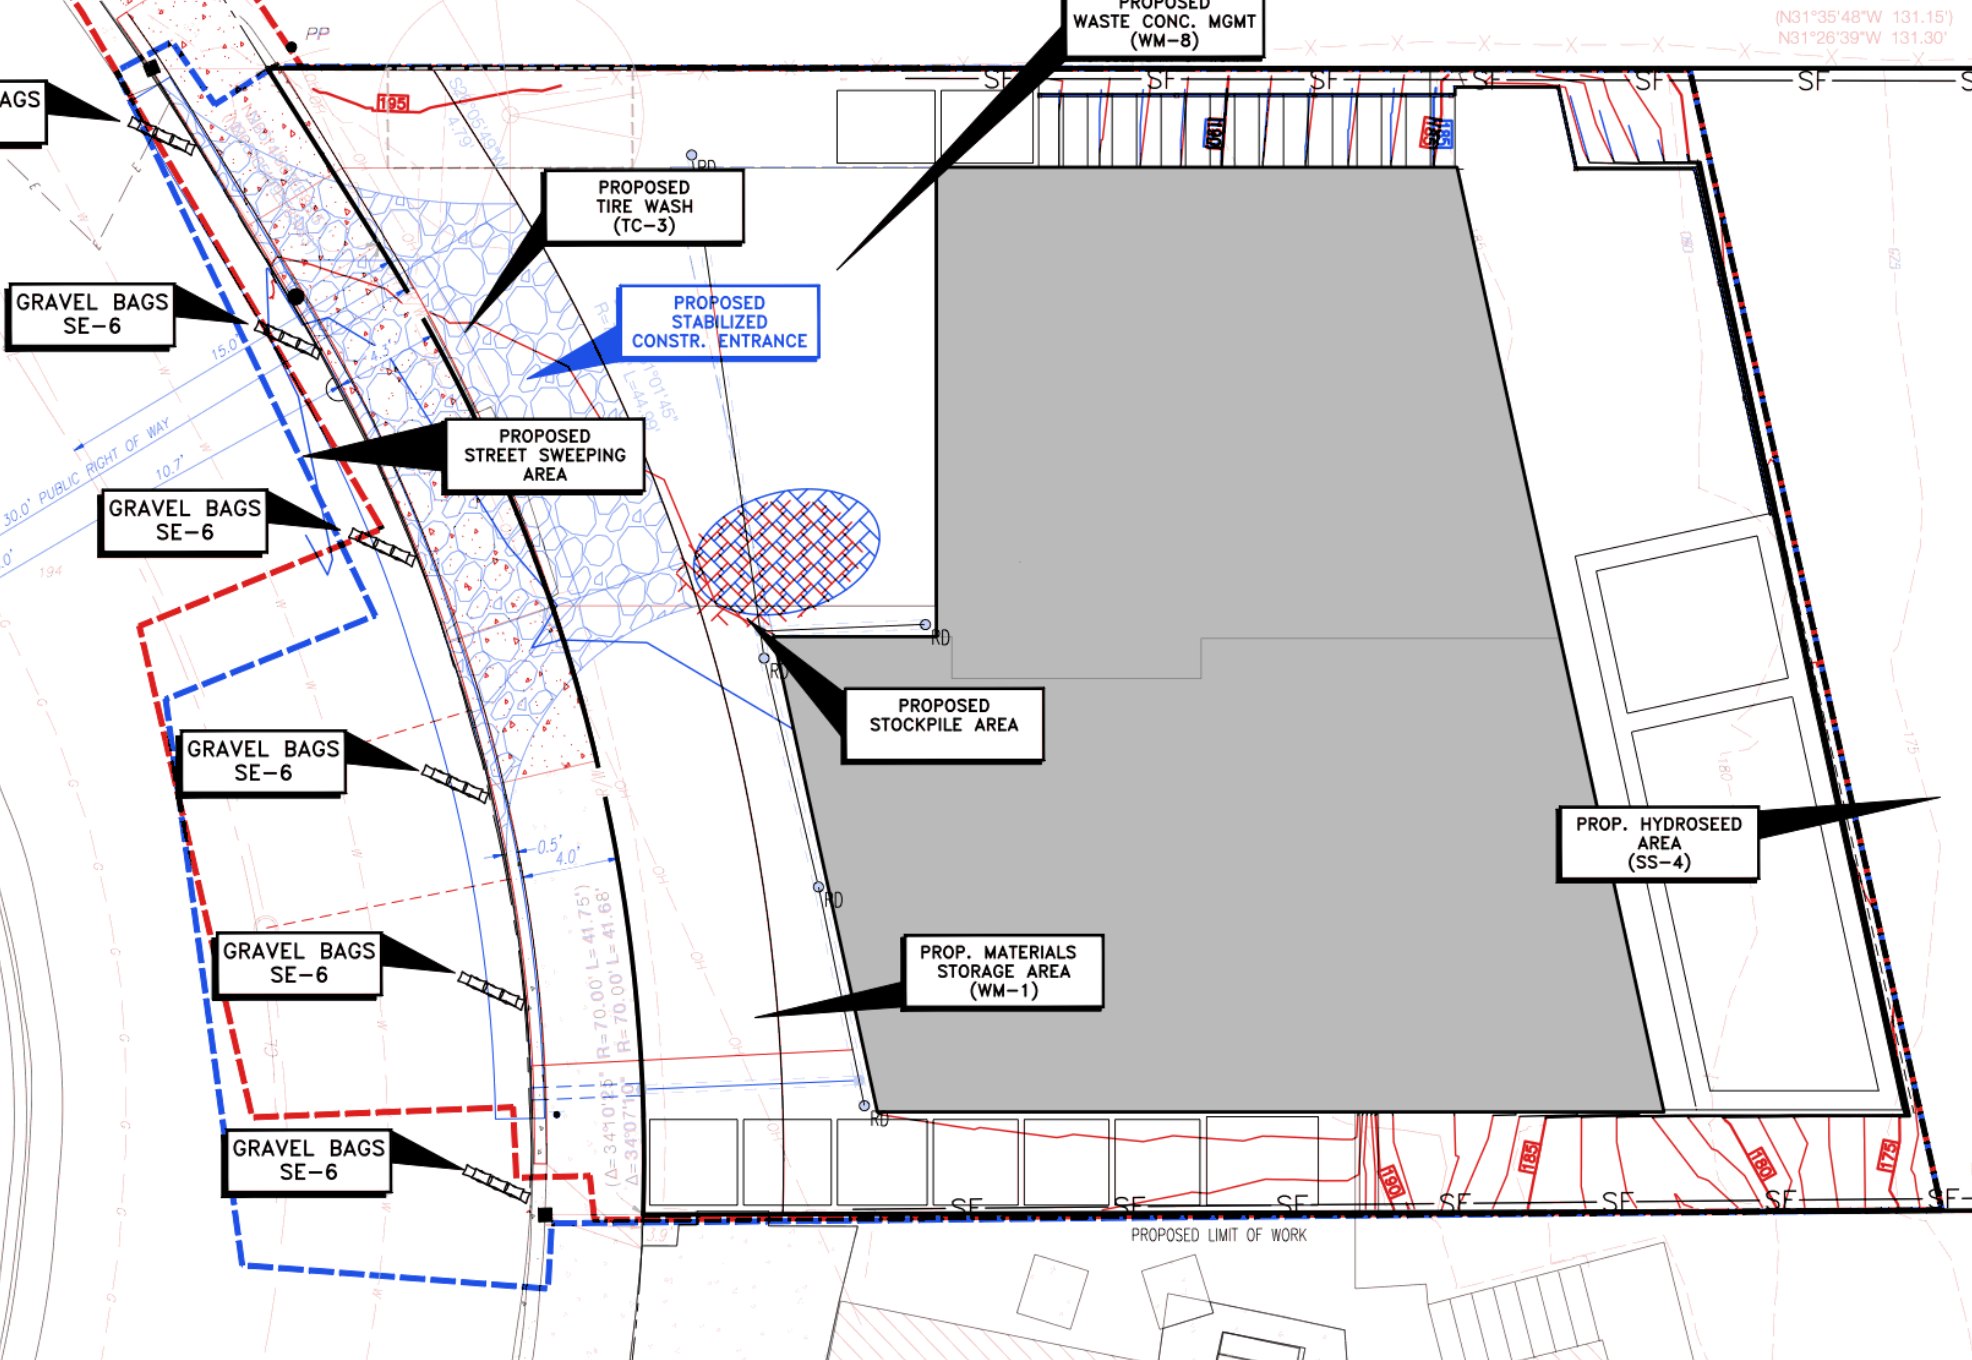
Overlay Pages: red older, blue newer, black bothCompare Documents: a cloud around every change
Compare RevisionsFlip between two prints as on a light table, sheet by sheet, without writing anything to either file. Slider: drag a divider to wipe from the older sheet to the newer. Onion Skin: fade one into the other. Red/Blue: lines only in the older sheet red, only in the newer blue, in both black. Clouds rings every changed area in any of these, and Changed words lists the numbers and words that differ (55.95 → 55.75); click one to go to it.
Overlay PagesA new PDF, one page per sheet, in red, blue and black.
Compare DocumentsA copy of the newer set with a cloud around every change, listed in the Markups List to step through.
Slip SheetReplaces sheets with the new revision's and keeps your markups, bookmarks and links where they were.
08Working with sets
The whole set
PagesDocument › Pages: insert from a file (⇧⌘I) or a blank page (⇧⌘N); extract (⇧⌘X), replace (⇧⌘Y), delete (⇧⌘D), rotate right (⌘R) and left (⌘L), crop and Remove Crop, split, and Move Up, Move Down (⌥⌘↑⌥⌘↓) or Move To….
Replace PagesSwap pages for pages from another file. Tick Replace page content only (keep markups) to put the new drawing under the markups already there.
Export PagesRight-click selected thumbnails › Export Pages: those sheets as a PDF, pictures (PNG, JPEG, TIFF, GIF, BMP), text (plain, RTF, HTML) or a Word document, with the markups as they are on screen.
Delete PagesPick the current page, the selected thumbnails or a custom range such as 1-3, 5.
Insert Blank PageA size (Same as Current Page, ARCH A to E, ANSI A to E, Letter, Legal, Tabloid or Custom), portrait or landscape, a style (blank, a 1/4 in or 1 in grid, engineering 5 per inch, or lined), how many pages, and where: before or after the first page, the last page or a page number. Set as Default remembers it.
Insert PagesAdd Files… or Add Open Files, pick All or a range from each, put them in order, use each file name as the page label if you like, and choose where they go.
Sheet labelsDocument › Labels and Numbering › Create Page Labels from Title Block…: draw a box around the sheet number once; Marqup reads the same spot on every sheet. Rename Page Label… and Reset All Page Labels are beside it.
BookmarksAdd from the sidebar's Bookmarks view, or make one per sheet from the labels.
Batch LinkFinds every place a sheet number such as C-5 appears on another sheet and links each one to its sheet. Remove All Links… takes them off.
LayersTurn CAD layers off to hide them on every sheet; the choice is saved for other viewers too. Isolate shows only the layers you pick.
Edit PDF ContentEdit › PDF Content: snapshot, cut or erase part of the sheet's own drawing, and select its text.
Recognize TextReads scanned sheets so Find, sheet labels and Batch Link work on them. After a file opens, Marqup also reads each sheet in the background, so Find works on CAD style sheets whose lettering is linework.
Page numbers · HeadersDocument › Labels and Numbering › Number Pages or Headers & Footers: text written on every sheet, with codes {page}, {pages}, {label} (sheet number), {date} and {file}.
Create PDFFile › Create: PDF from File (⌘N) for pictures, Word, RTF, web pages or text, PDF from Multiple Files, Blank PDF (the same sizes and styles as Insert Blank Page), PDF from Scanner or Camera, or Import from iPhone or iPad.
ExportFile › Export: the current sheet or every sheet as PNG or JPEG, selected pages as a PDF, a flattened copy, the Markups List as CSV or Excel, the Markups Summary as a PDF, or the Markups Report as Word.
SetsGather several PDFs into one list of sheets you can move through as if they were one file.
BatchFlatten, Flatten for Submittal, page numbers, passwords, repair or text recognition on a whole folder at once. The originals are not changed.
SecurityProtect a set with a password and choose what others may do (print, copy, mark up); Remove Security takes it off again with the password.
Repair PDFDocument › Repair PDF…: rebuilds a damaged file from scratch, and can also repair page content, turn text that was exported as a clipping mask back into plain text, remove clips that hide nothing, turn one-color pictures into plain filled boxes, and compress and tidy what is stored. Add several files at once; Set as Default remembers your choices.
Reduce File SizeFour levels, from light to smallest. Pictures are scaled down and re-saved as JPEG; line work and markups are never changed. Marqup reports how much it saved.
RedactDocument › Redaction › Redact: drag boxes over what must go, or Mark Search Results to box every match, then Apply Redactions…. Text, line work, picture pixels, markups and stored search words under each box are removed and a black box is drawn; Marqup then reads the sheet again to confirm. Clear Redaction Marks removes boxes not yet applied. It saves a new file ending "- Redacted" by default. Look through the redacted copy before you share it.
Find on a scanned sheet after Recognize TextLayers: the irrigation layers turned off
09Exhibits
Make an exhibit
Document › Exhibit has everything here. A title block, a drawing taken from another plan, a graphic scale and your own words make an exhibit, a simple drawing or a figure for a report.
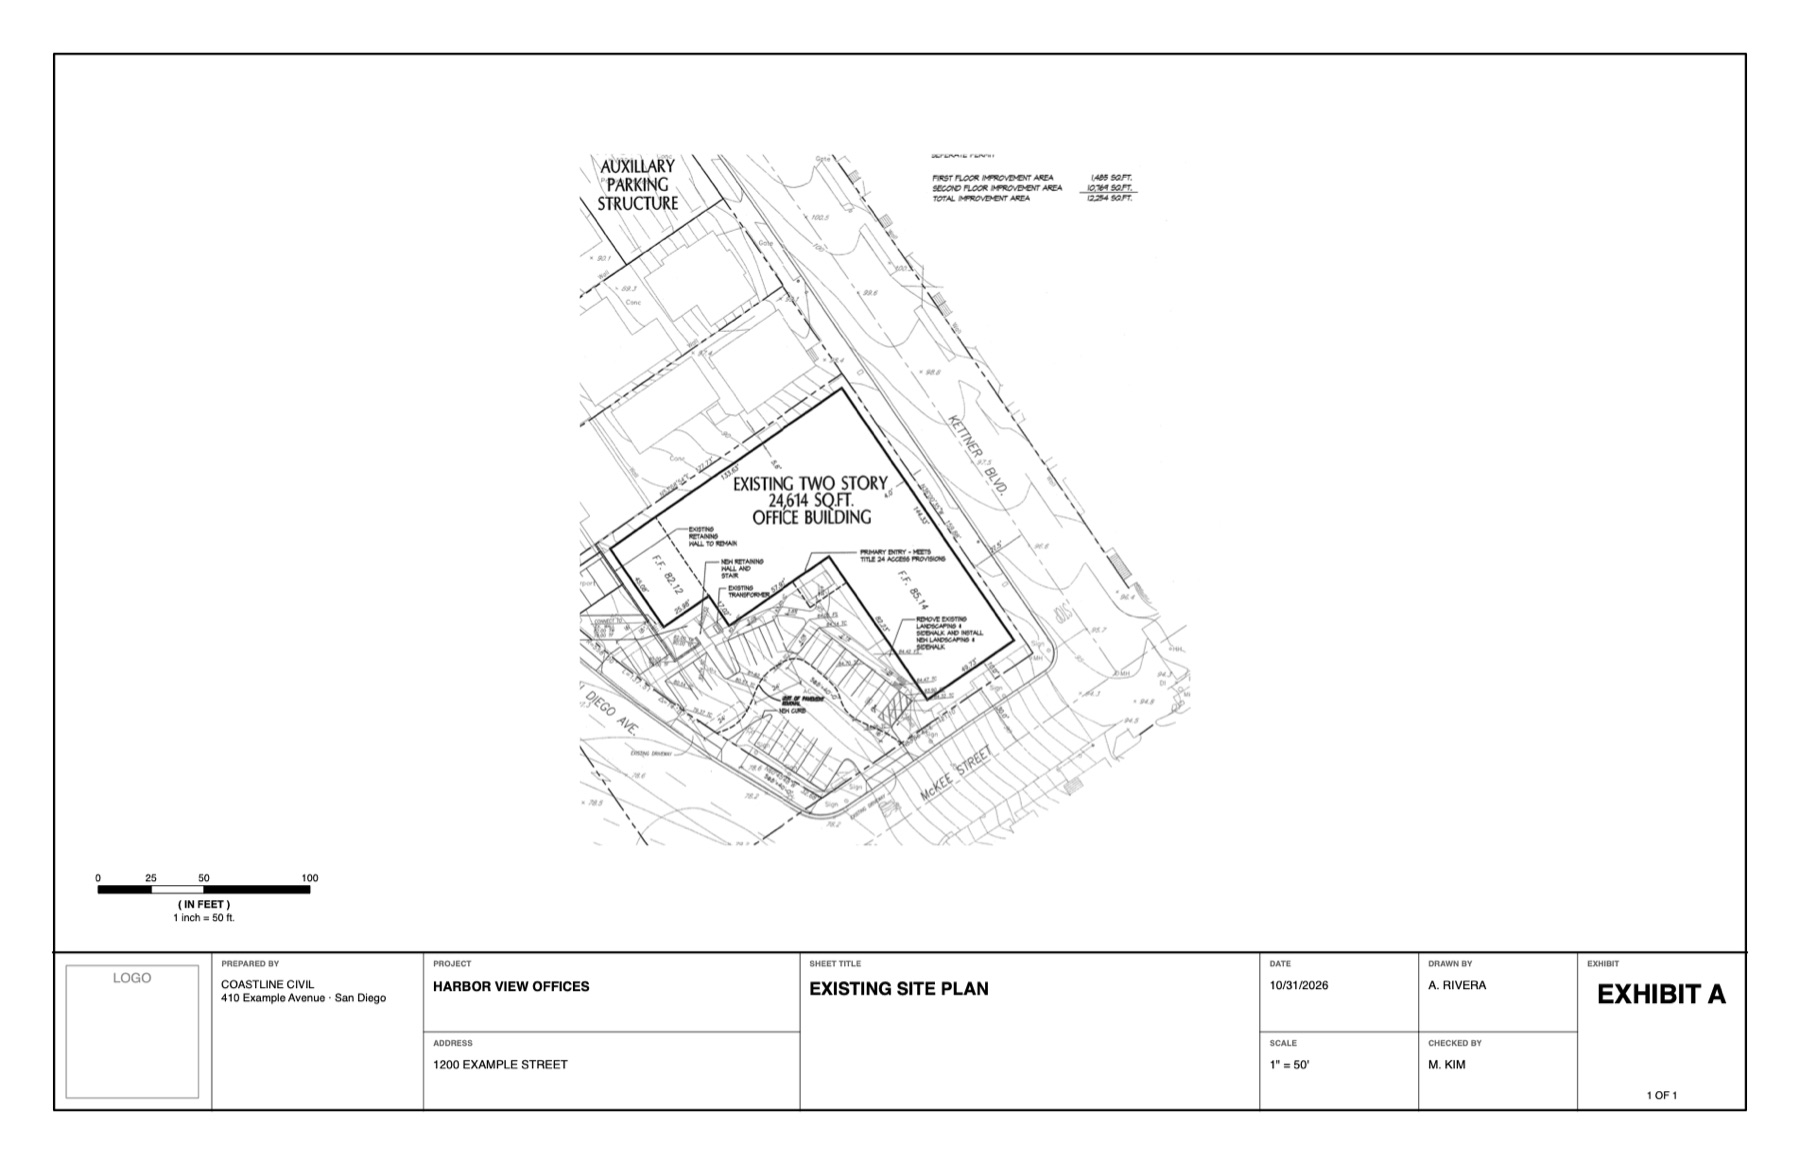
New Exhibit ⌥⌘NFile › New Exhibit…: a sheet size (Letter, Tabloid 11 × 17, ARCH C, ANSI D, ARCH D or Custom), portrait or landscape, and a title block. It opens straight away, unsaved and ready to fill; you name it and choose where it goes when you save or close it (see New files under Saving).
Title Blocks libraryThe title block templates, the four below and any you saved yourself, also appear as a library in the Library Manager and the Tool Chest. Drag one onto any sheet to put it there.
Title blocksRight-Side Strip (a plan set strip down the right edge), Bottom Strip (a band across the bottom), Corner Box (a small block in the lower right) or Exhibit Banner (a large exhibit name across the bottom). Each has a border, a logo box, company, project, address, sheet title, date, scale, drawn and checked by, and exhibit and sheet number. Add Title Block… puts one on any sheet, replacing the one there.
Kept togetherA title block moves, resizes and deletes as one piece, so its frame never slips out of line. Double-click any words in it to type over them.
Edit Inside Title BlockDouble-click the frame or the logo box (or right-click › Edit Inside Title Block) to pick its pieces one at a time: move the logo box, nudge a field or restyle its words. The frame lines stay put. Esc or a click outside finishes. Ungroup asks first and offers Edit Inside instead.
Exhibit InfoCompany, project, address, client, date, drawn by and checked by, typed once for every title block in the file; Today fills the date. A sheet whose words you changed by hand keeps them. Your company and initials are remembered for the next exhibit. Each sheet's title and exhibit name are typed on that sheet.
Filled for youThe scale field shows the sheet's scale (AS NOTED if it has none) and the sheet field counts 1 OF 3, 2 OF 3 across the sheets with title blocks. Both update as you work.
Place DrawingChoose a plan PDF and pick its sheet. The whole sheet goes onto your exhibit, and a floating Crop Drawing bar appears with Rectangle, Polygon, Whole Sheet, Keep Scale, Cancel and Done. The drawing stays sharp line work and goes under the title block.
Crop it on the sheetRectangle: drag a box round the part you want, leaving the plan's title block out. Polygon: click round an odd shape and double-click to close it. Whole Sheet keeps everything. While you crop, the part that will be cut away shows grayed and the part you keep stays at full strength, so you see the result before you commit. Done cuts it. Cancel leaves the crop as it was; a drawing you just placed stays whole.
Keep ScaleThe button with a ruler under a padlock. On, the drawing keeps the plan's own scale, true size, such as 1" = 20', instead of being fitted to the space. Off, it is fitted to the sheet at the largest standard engineering scale that fits. Marqup reads the plan's scale where it can, and the sheet's scale is set to match, so you can measure on the exhibit.
Light on the MacPlaced drawings are drawn once and kept ready, so an exhibit with several plans on it scrolls and zooms as smoothly as any other sheet.
Re-crop DrawingRight-click a placed drawing › Re-crop Drawing…: the whole original sheet comes back with your box on it. Draw a new box and the drawing grows or shrinks around the same line work, which stays where it was on your sheet. The cut-away part is hidden, not deleted, so this works after the file is saved and reopened too.
Graphic scaleGraphic Scale, Blocks or Ticks: a bar for the sheet's scale in round numbers (0, 25, 50, 100 feet at 1" = 50'), placed at the lower left of the drawing. Change the sheet's scale and the bar redraws itself; it always keeps its true size. North arrows are in the Tool Chest's North and Scale library.
BrandingReplace the logo box with your logo (Image tool or a stamp), add stamps, symbols, notes and line work like on any sheet.
Your own templatesSelect a finished title block › Save Title Block as Template…. It is listed in New Exhibit and Add Title Block on this Mac, logo and all, and fits other sheet sizes: pieces near an edge keep their distance from it and the border stretches.
In other appsExhibits are ordinary PDFs: the title block opens as a group of markups, the drawing as a stamp, and the scale is saved with the sheet.
New Exhibit · Bottom Strip · Place Drawing at 1" = 50' · graphic scale · names made up
10Saving, sharing, submittals
Send it back
Save ⌘SSaves the markups into the PDF as standard PDF annotations. Any PDF reader shows them, and other plan review apps open them as editable markups with their colors, measurements, status and replies.
ShareThe Share button sends the file by Mail, Messages or AirDrop.
New filesA new PDF, from Create Blank PDF, Combine Files, a scan, a converted file or New Exhibit, opens straight away as Untitled (or with a name such as Exhibit or Combined), without asking where to save it first. ⌘S asks for a name and a place the first time.
Keep this new document?Close a new file you have not saved and Marqup asks: Do you want to keep this new document? Type a name in Save As, pick a folder in Where, and click Save. Cancel goes back to the file. Delete, in red at the lower left, throws the new file away.
Flatten Markups ⇧⌘MDraws markups into the sheet in this file, by type, page or selection. Leave Allow markup recovery on and Unflatten Markups brings them back.
Flattened PDF CopyFile › Export: a copy with everything drawn in; your working file keeps its markups.
Earlier savesSettings › Advanced › Open Earlier Saves: each file as it was before each of its last 30 saves, named with the date and time. Open Backups Folder holds a copy from before every page change.
Flatten for Submittal
Agency upload portals reject PDFs that carry markups, attached files or hidden data. File › Export › Flattened for Submittal (also in the Document menu and in Batch) first shows what it will clean up, each item with its own checkbox (all on to start, remembered for next time), then always saves a new file under a new name, so the original is never overwritten:
Every markup, seal, signature and stamp is drawn into the sheet. Nothing visible is deleted.
Empty CAD style SHX text boxes that CAD exports leave behind are removed (they draw nothing).
Attached files, XML (XMP metadata) on the document and on every image and font, XFA forms, JavaScript and automatic actions, viewports and their measurement scales, and CAD application data are removed.
CAD layers are merged into the drawing: what you see stays as plain drawing, and anything on a hidden layer is left out, so the sheets look exactly as they did. Turn this off to keep the layers.
Fillable form fields are kept, since agencies accept them.
Marqup then draws every sheet of the copy and the original and compares them, and tells you if any sheet looks different.
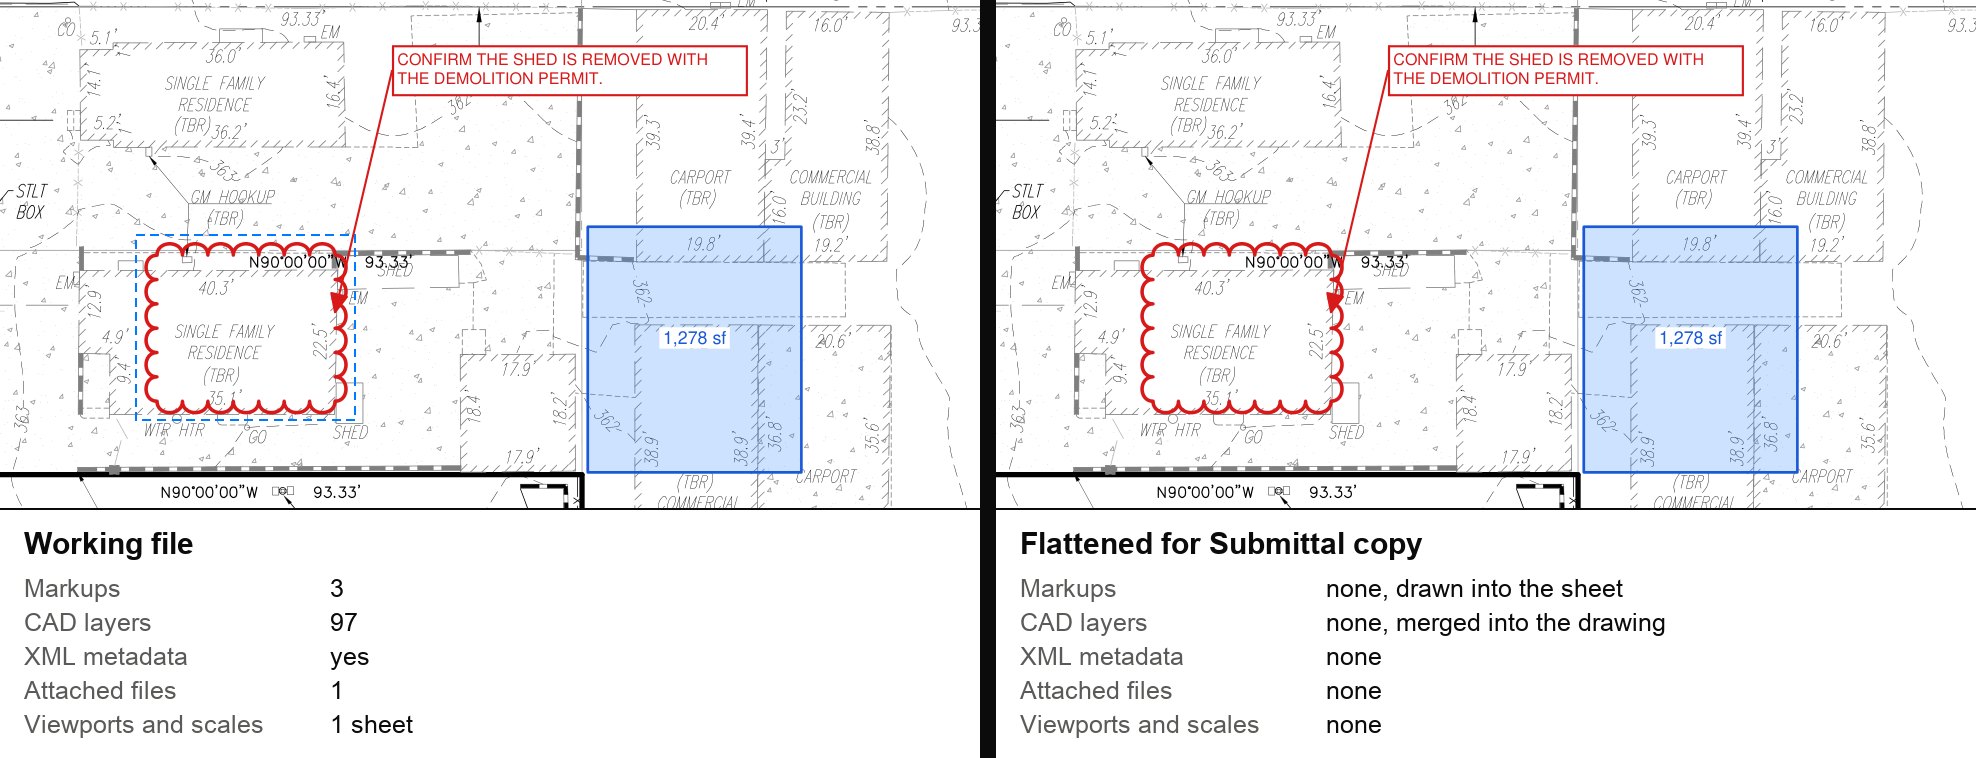
Working file and submittal copy, with what each contains
Your working file is not changed. Upload the copy; keep the working file for the next round of comments. Many agency e-plan portals reject files that still carry markups, layers or attached files.
11Keyboard shortcuts
Single keys pick tools when no text is being typed. ⌘ Command · ⇧ Shift · ⌥ Option · ⌃ Control.
Select and view
SelectV
Pan⇧V
Pan while heldSpace
Zoom toolZ
Zoom in · out⌘=⌘-
Fit Width · Fit Page⌘1⌘0
Single Page · Continuous⇧S⇧C
Previous · next sheet←→
Previous · next sheetPage UpPage Down
First · last sheetHomeEnd
Go to Page⌥⌘G
Sidebar⌃⌘S
Markups List⌥⌘L
Properties⌥⌘I
Show Tools⌥⌘T
Option bar⌥⌘O
Clean Screen⇧⌘F
Full Screen⌃⌘F
New Window for This File⌃⌘N
Select Text⇧T
SnapshotG
Markup
Callout · Callout PlusQ⇧Q
Text Box · TypewriterTW
Cloud · Cloud+CK
Rectangle · EllipseRE
Line · ArrowLA
DimensionD⇧L
Polyline · PolygonP⇧P
Pen · HighlightIH
StampS
Finish a line or cloudReturn
Edit the selected textReturn
Put the tool downEsc
Reuse Tools⌥⌘K
Fit text box to text⌥Z
Bring forward · to front⌘]⇧⌘]
Send backward · to back⌘[⇧⌘[
Lock · Unlock⇧⌘L
Smaller · bigger (tool size)[]
Hide all markups⌃⇧⌘M
Library Manager⌥⇧⌘L
New Exhibit⌥⌘N
Measure
Length · Area⇧⌥L⇧⌥A
Perimeter · Volume⇧⌥P⇧⌥V
Dynamic Fill · Count⇧⌥F⇧⌥C
Angle · Radius · Arc⇧⌥G⇧⌥R⇧⌥J
Calibrate⇧K
Read Scale from Sheet⇧⌘K
Object snap on · offF3
Edit and file
Undo · Redo⌘Z⇧⌘Z
Cut · Copy · Paste⌘X⌘C⌘V
Delete⌫
Select all on the sheet⌘A
Select Similar⇧⌘A
Select all sheet text⌥⌘A
Group · Ungroup⌃⌘G⌃⇧⌘G
Nudge (bigger with ⇧)← ↑ → ↓
Find · next · previous⌘F⌘G⇧⌘G
Open · Save · Save As⌘O⌘S⇧⌘S
Create PDF from File⌘N
Print⌘P
Export Markups List⇧⌘E
Flatten Markups⇧⌘M
Move pages up · down⌥⌘↑⌥⌘↓
Document Properties⌥⌘D
Settings⌘,
12iPad and iPhone
In the field
Marqup for iPad and iPhone is in testing through TestFlight. It opens the same PDFs, with the same markups and measurements as the Mac.
Opening screenMarqup opens to its own start screen with three parts: Favorites, Recent and a folder browser.
FavoritesInside any folder, tap the star next to a folder or file, or Add to Favorites at the top, and it is listed under Favorites, one tap away: a project folder on a shared drive, Google Drive, Dropbox, OneDrive or a server. Press and hold a Recent file and choose Add Its Folder to Favorites to star the folder it came from.
RecentThe files you opened last, newest first, each with a picture of its first sheet.
Folder browserMove through your folders, folders first and then PDFs, by name or newest first, and tap a PDF to open it. A file kept only in the cloud shows Downloading… while it comes down. Don't see Google Drive, Dropbox or OneDrive? Install its app, then turn it on in the Files app under Browse.
Punch listTap the sheet to add a punch item, and set who it's for from the typing bar. Add up to 3 photos per item and swipe through them in the photo viewer. The punch window sorts by sheet or responsible party and exports the same PDF report, Excel list and check-off web page as the Mac (see Punch list). Settings sets the photo quality.
Exhibit MakerMore › Exhibit: start an exhibit with a title block, place a drawing from a plan and add a graphic scale, as on the Mac (see Exhibits).
13Help and updates
Help and updates
Send Feedback · Report a BugHelp menu. Choose Problem, Suggestion or Question, write a few words and click Send: it goes straight to the Marqup team with the Mac and Marqup versions and, if you tick them, a picture of the window and the report from the last time Marqup quit unexpectedly. Without an internet connection it waits and goes the next time Marqup opens. Attaching the open PDF is the one choice that goes by email from your mail app, since files are never uploaded. Or write to support@marqup.app.
After a crashIf Marqup quit unexpectedly, it asks when it next opens whether to send the report, with room to say what you were doing; tick Always send crash reports to skip the question. The report holds the Marqup and macOS versions, the Mac model and where in Marqup it stopped, never your files.
UpdatesUpdating is always your choice. When a new version is ready Marqup offers Update Now, Later or Skip This Version; Update Now takes a few seconds and reopens your files. Turn the check off in Settings › Advanced, and use Marqup › Check for Updates… any time. Beta copies get each new beta the same way, so there is nothing to download again.
About MarqupMarqup › About Marqup: the version and build, the License Agreement and the Acknowledgments.
LegalHelp › Privacy Policy, Terms of Use and License Agreement open those pages on marqup.app.
Beta statisticsBeta copies share anonymous usage statistics until you turn off Settings › Advanced › Share anonymous usage statistics: which tools and commands are used, how long Marqup is open, how many pages are opened, the Mac's system version and error codes. Never your files, file names, markup text or measurements. Other copies send nothing.